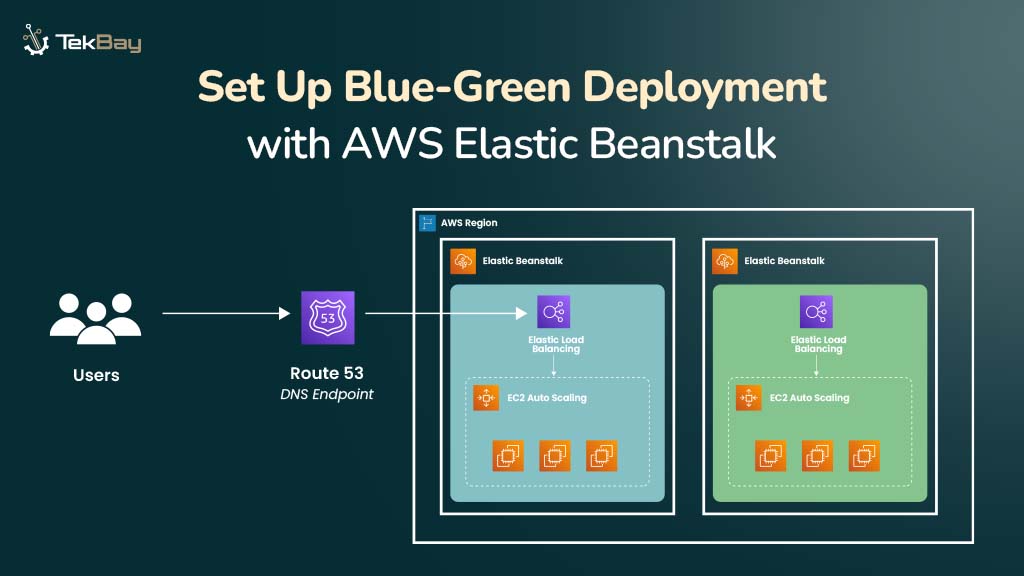
Blue-green deployment is a reliable method for updating applications with zero downtime. It uses two identical environments: a live (Blue) environment and a staging (Green) environment.
New application versions are thoroughly tested in the Green environment. Once validated, traffic is switched to it with minimal disruption, making rollbacks quicker and easier if needed.
AWS Elastic Beanstalk simplifies this process by managing the environments and automating traffic switching, allowing you to deploy updates confidently and efficiently.
This guide will walk you through setting up Blue-Green deployments on Elastic Beanstalk.
Why Use Elastic Beanstalk for Blue-Green Deployments?
AWS Elastic Beanstalk automates environment setup—servers, load balancers, and networking—minimizing manual work. It simplifies traffic switching between Blue and Green, reducing downtime and disruption. Built-in CloudWatch monitoring and Elastic Load Balancer help maintain a seamless user experience during deployments.
Prerequisites
Before proceeding with the setup, ensure you have the following:
- AWS Account with access to Elastic Beanstalk and related services.
- IAM User with Permissions to manage Elastic Beanstalk, EC2, S3, IAM, and CloudWatch.
- Zipped Application Code ready for deployment (no nested folders).
- Basic AWS Console Knowledge to navigate and configure services.
Steps To Set Up Blue-Green Deployment In AWS Elastic Beanstalk
Step 1: Set up the Blue (Production) Environment
1.1 Create An Application
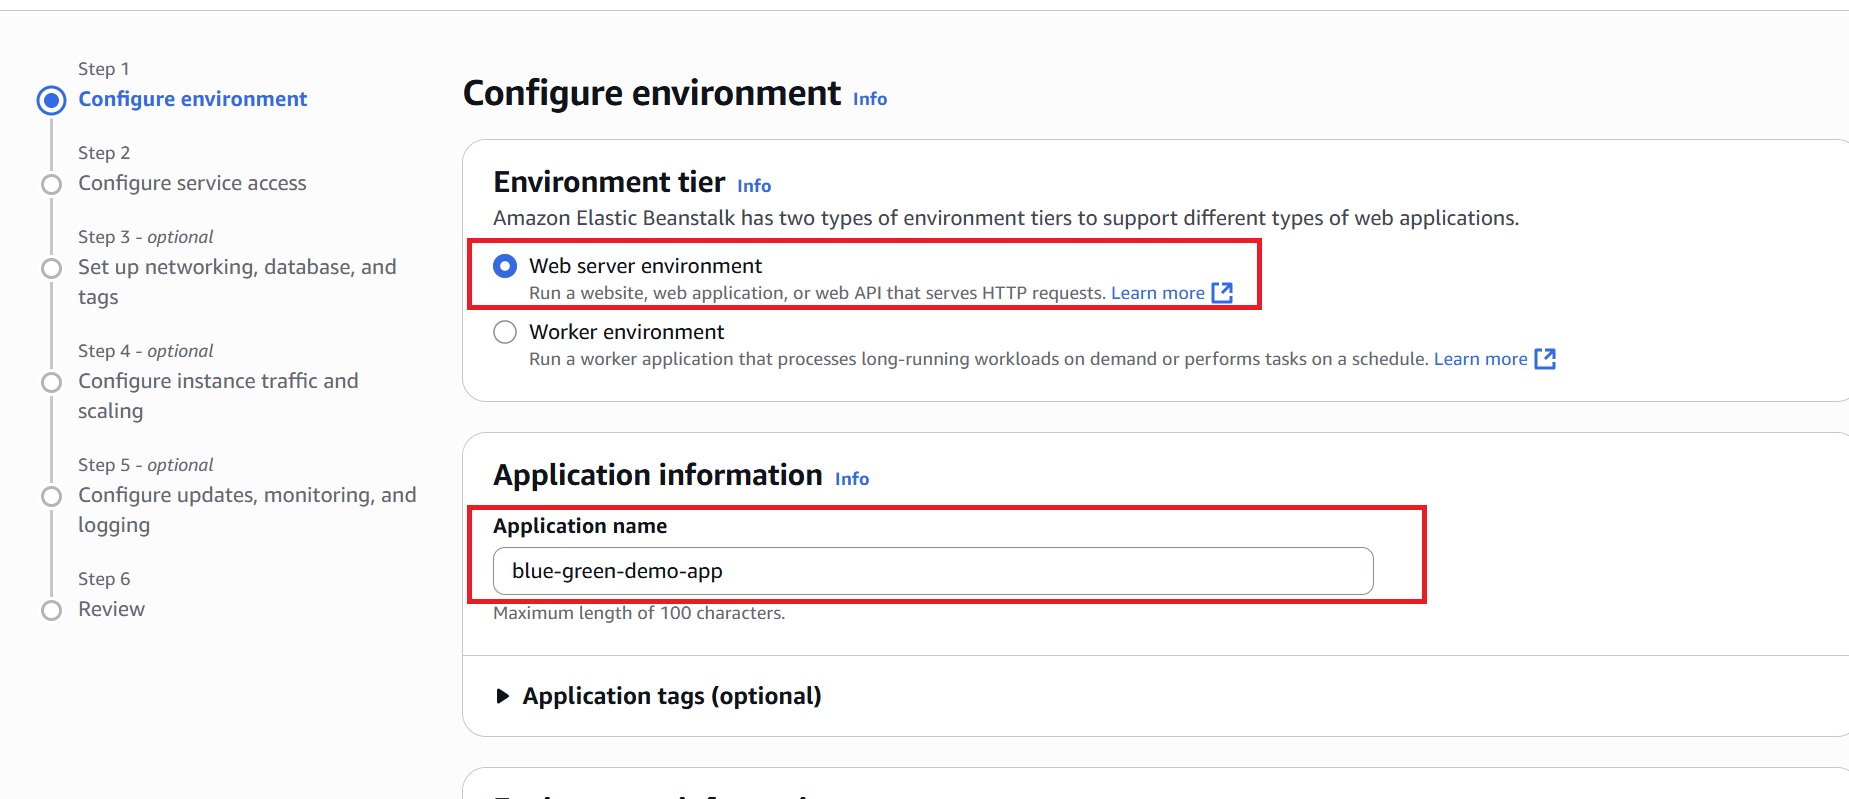
- In the AWS Console, navigate to Elastic Beanstalk, and click “Create Application.”
- In the “Environment tier” section, choose “Web server environment” since this tutorial focuses on running a web application.
- Provide a name for the application (for example, blue-green-demo-app).
1.2 Create and Configure Blue Environment
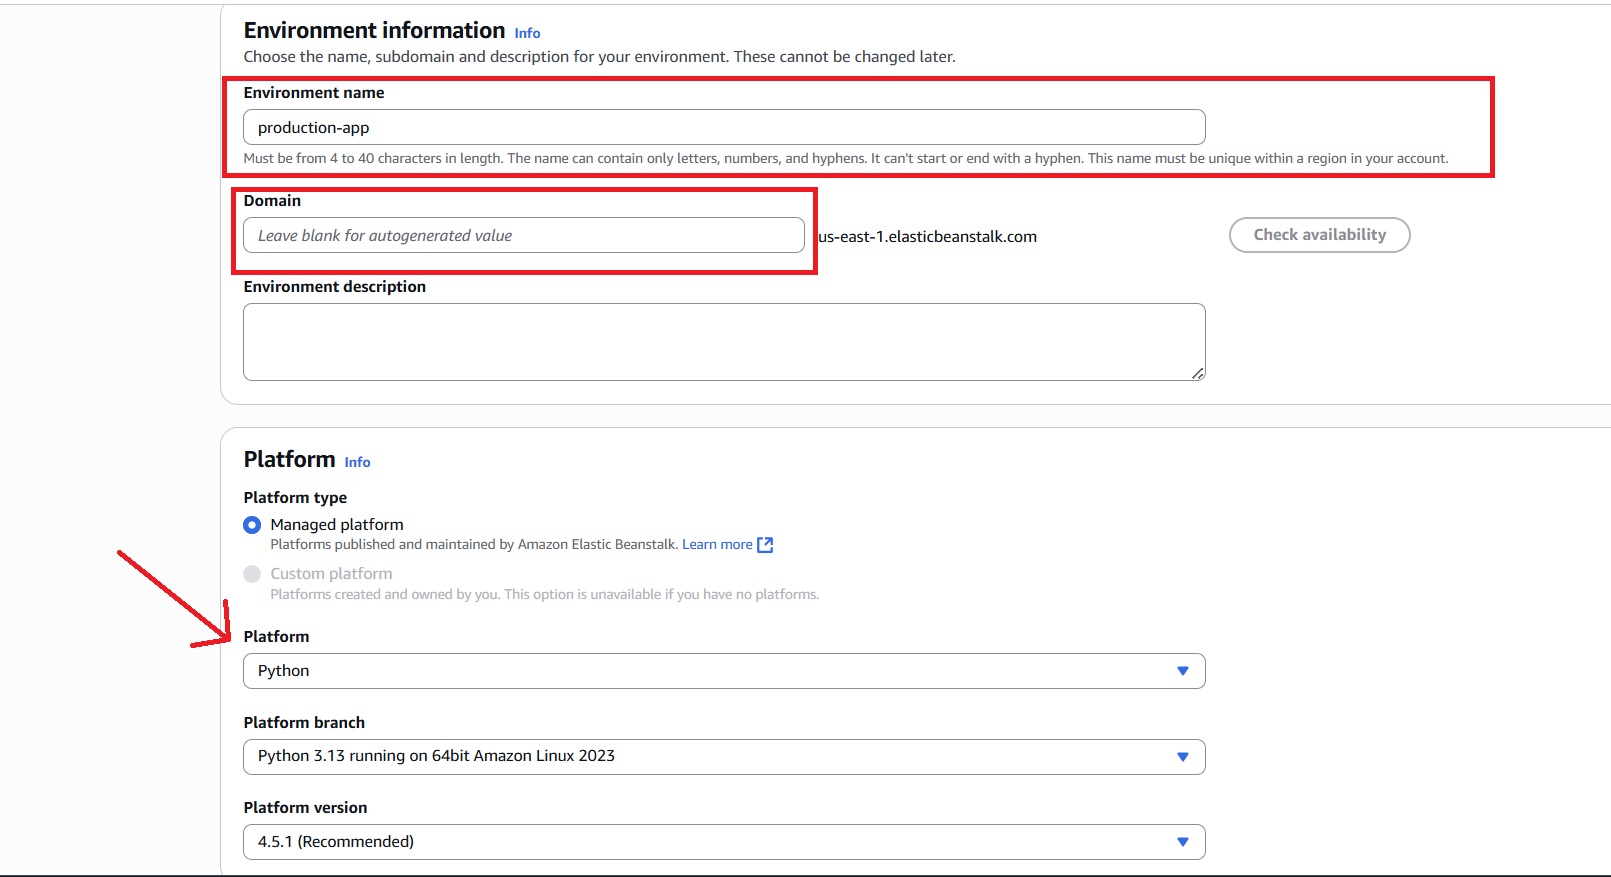
- Provide a name for the production environment, for example: production-app.
- For the Domain name, if left blank, it will be autogenerated, or you can customize it.
- In the Platform section, choose “Managed platform” and select a runtime that matches your application (Python is used for this tutorial).
- Leave the Platform branch as the default unless a specific version is required.
1.3 Set Application Code and Presets
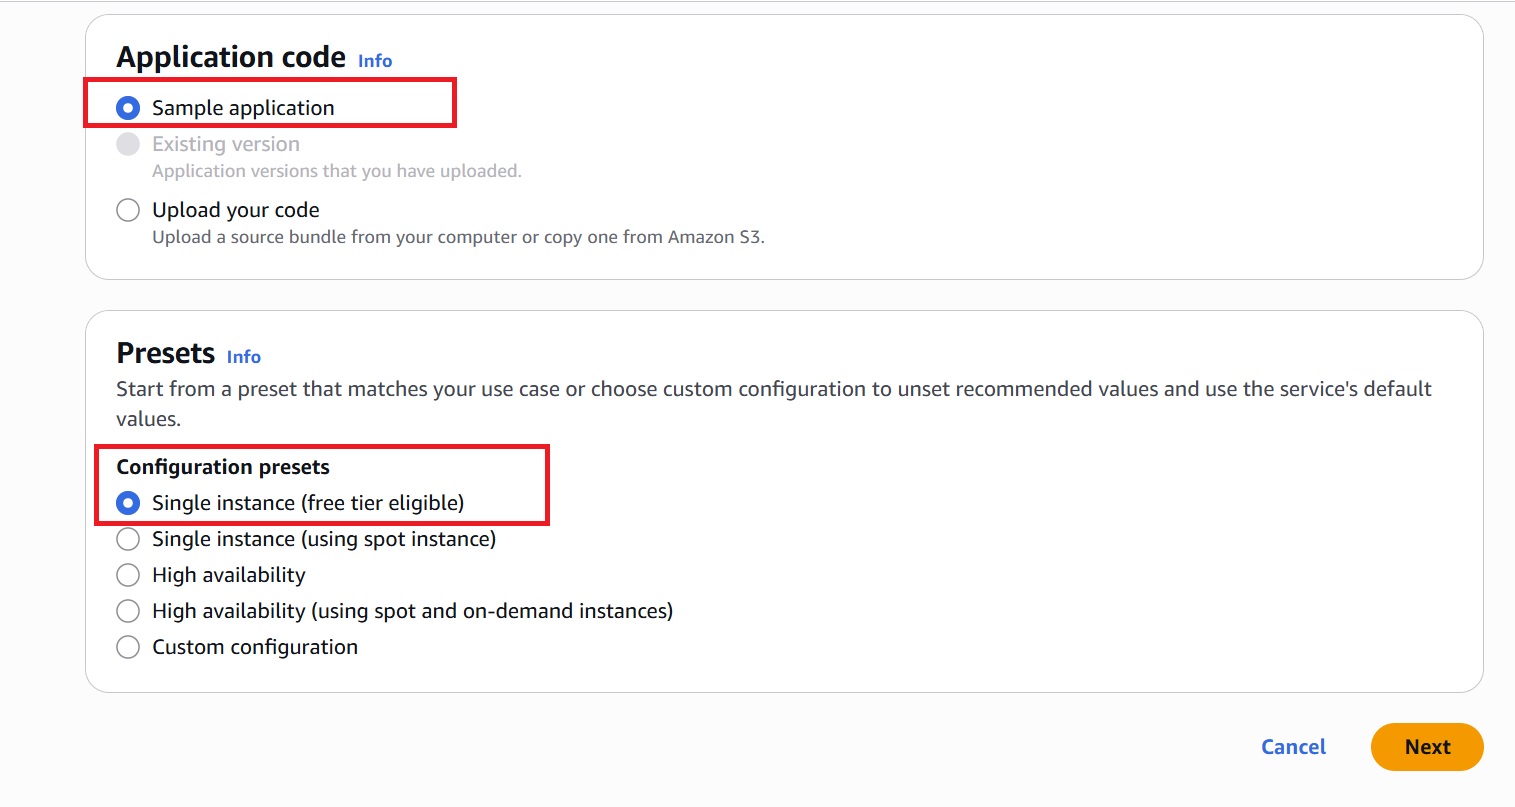
- If you don’t have your application code, choose “Sample application.” It will automatically match the selected runtime. Alternatively, one can upload a ZIP file containing their application code.
- Select Presets for the application, or configure it manually to match specific requirements.
- Click “Next.”
1.4 Configure Service Access
- Under the ‘Service role’ section, choose an existing service role from the dropdown or manually create a new IAM role for Elastic Beanstalk.
This role allows Elastic Beanstalk to manage AWS resources like EC2, S3, and CloudWatch on your behalf. - In the ‘EC2 instance profile’ section, choose an existing role or manually create an IAM role for EC2 if it’s unavailable.
This role allows the environment’s EC2 instances to access AWS services like S3 and CloudWatch.
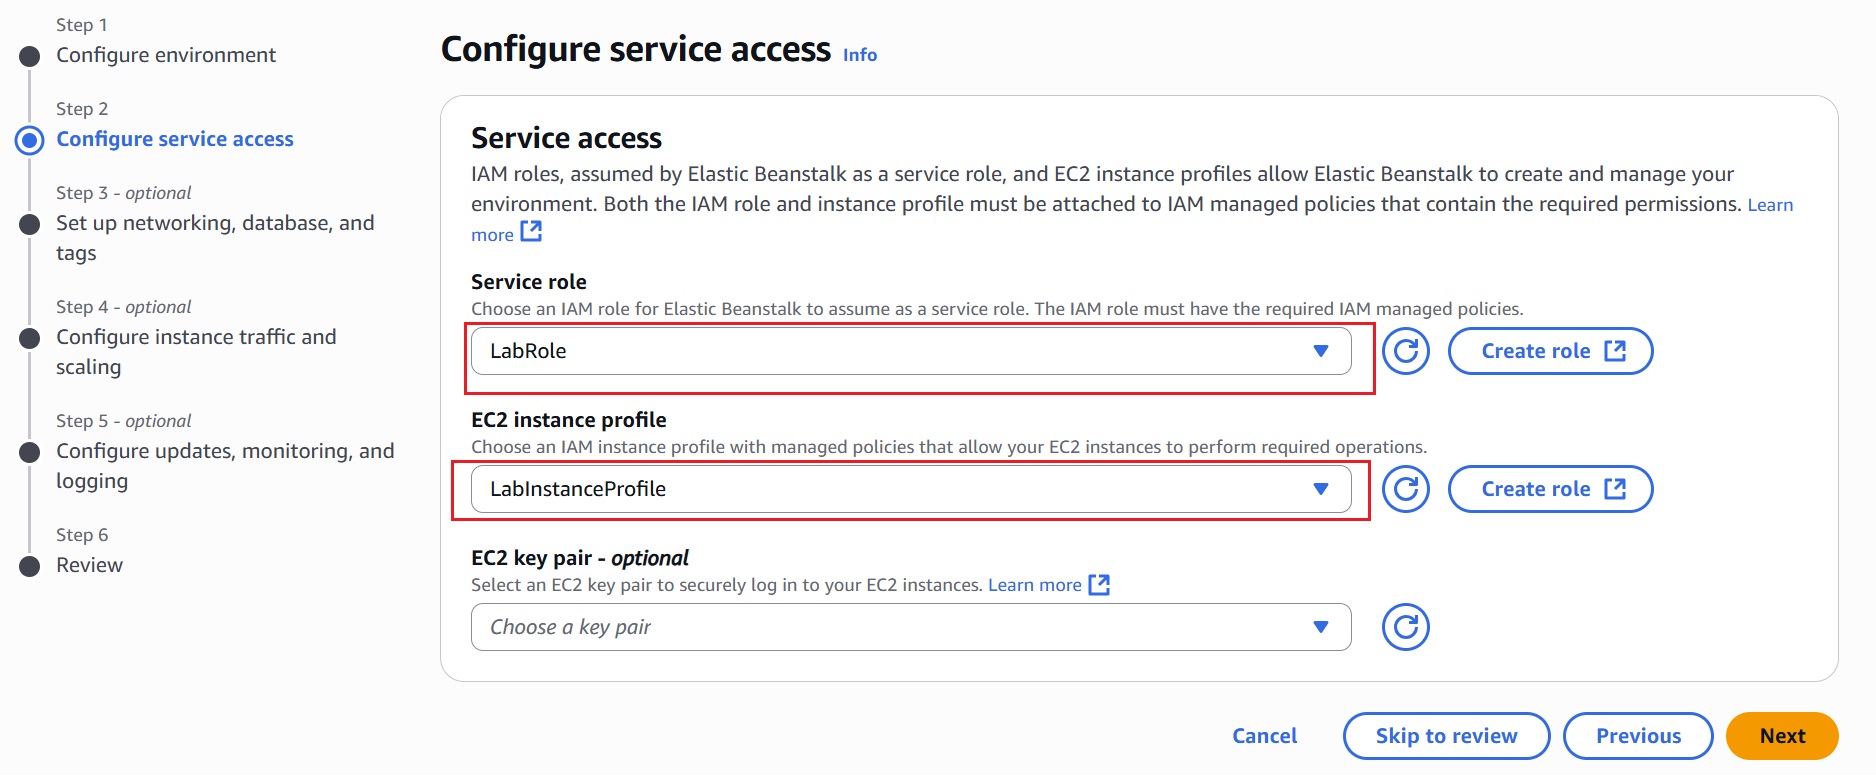
- Click “Skip to Review” to proceed.
Note: Optional steps like networking, database setup, scaling, and monitoring can be skipped unless custom configurations are required. Elastic Beanstalk applies default settings by default.
1.5 Launch Elastic Beanstalk Environment
After reviewing the configurations, click “Create” to launch your Elastic Beanstalk environment.
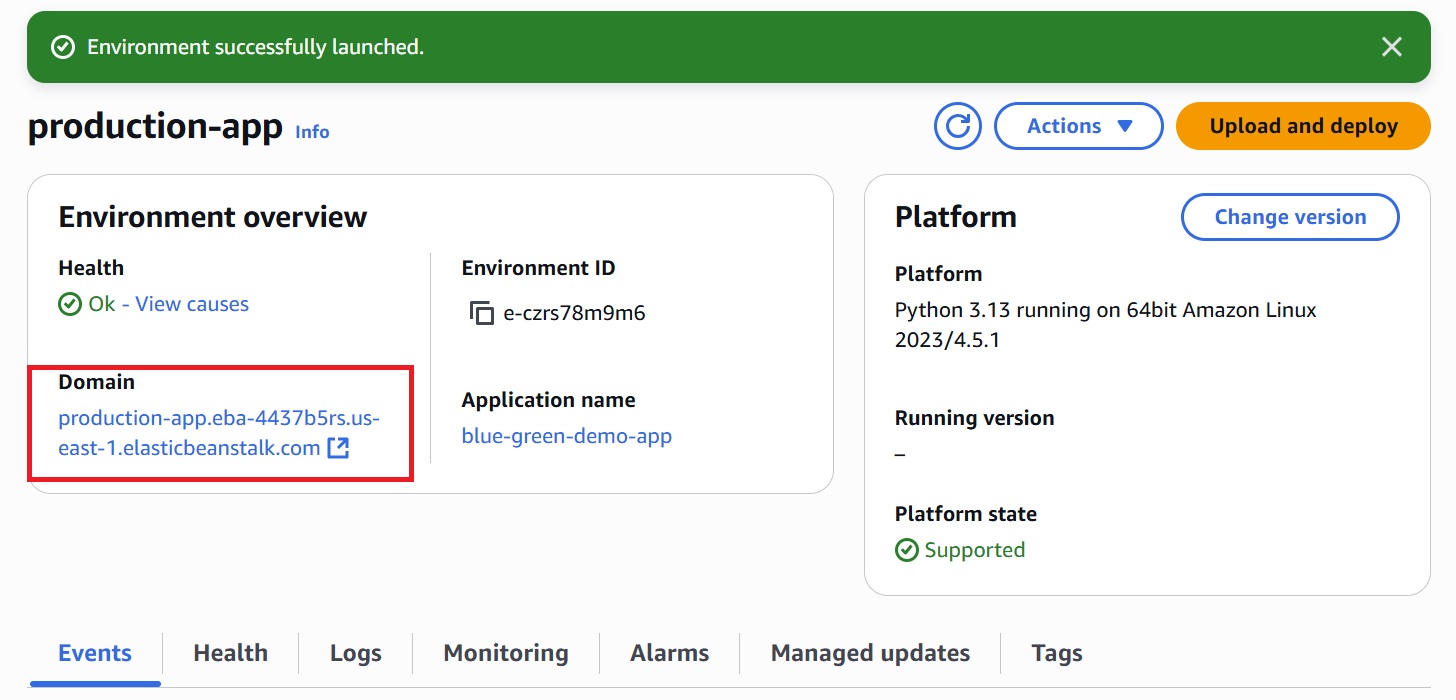
- After successfully creating the Elastic Beanstalk environment, it provides a default domain URL, as shown in the image above.
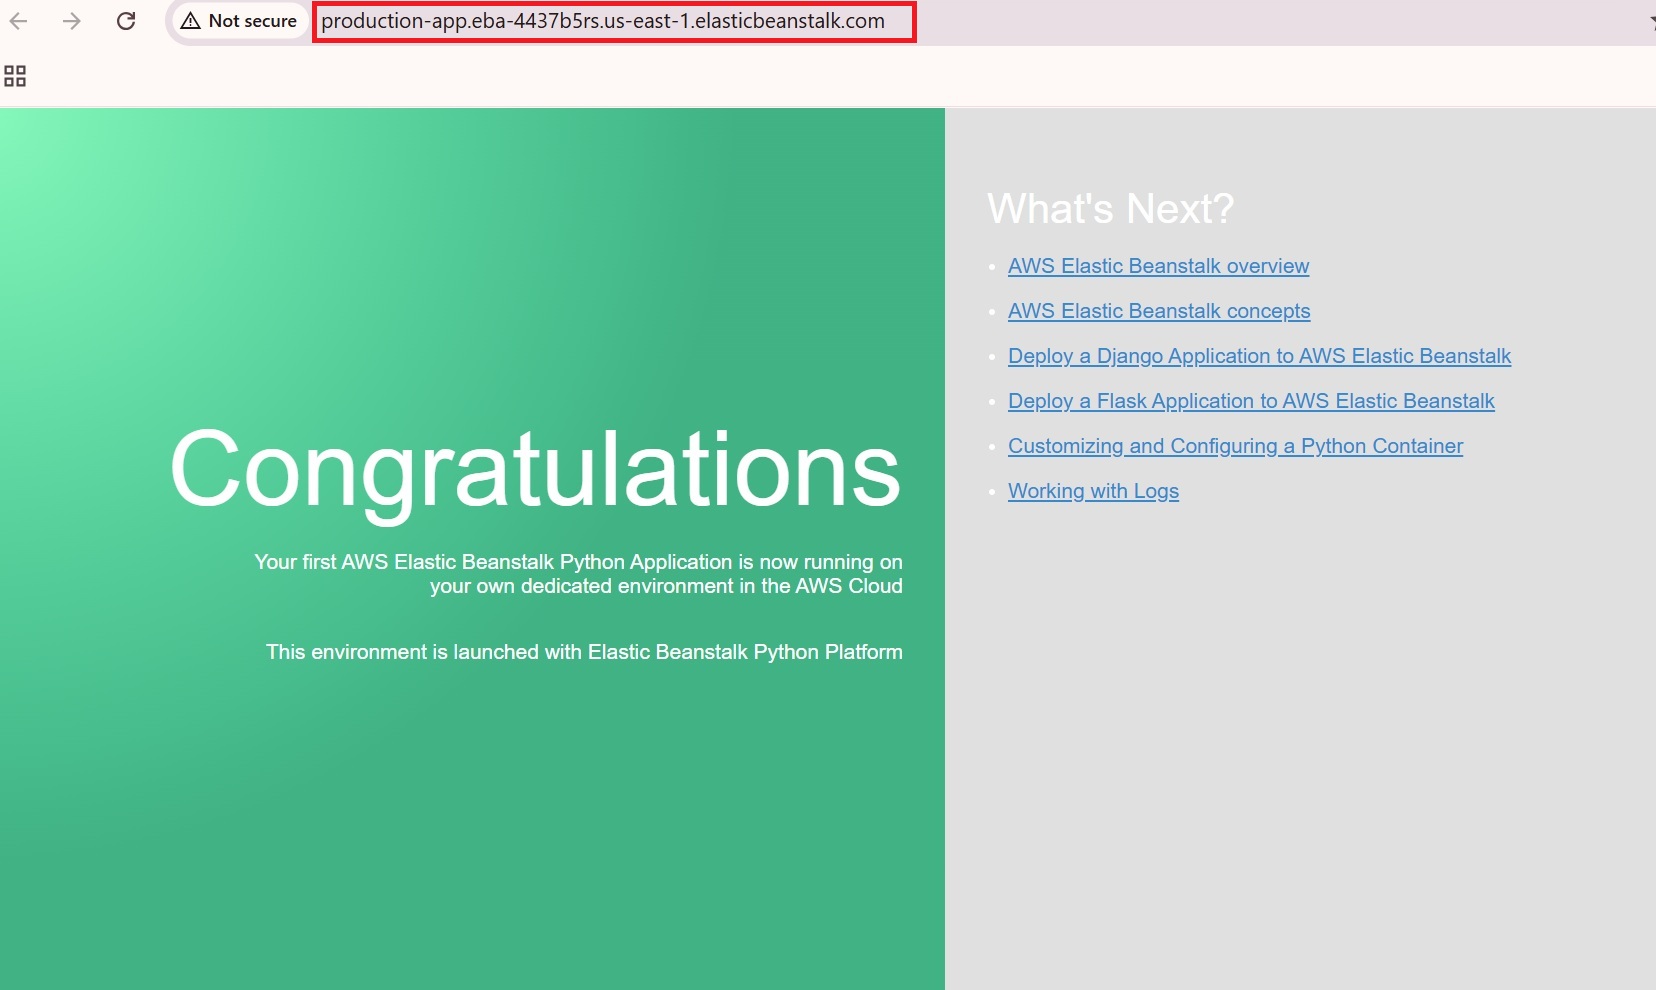
- Navigate to the domain (production-app.eba-4437b5rs.us-east-1.elasticbeanstalk.com) to access the deployed application.
Step 2: Clone to Create the Green (Staging) Environment
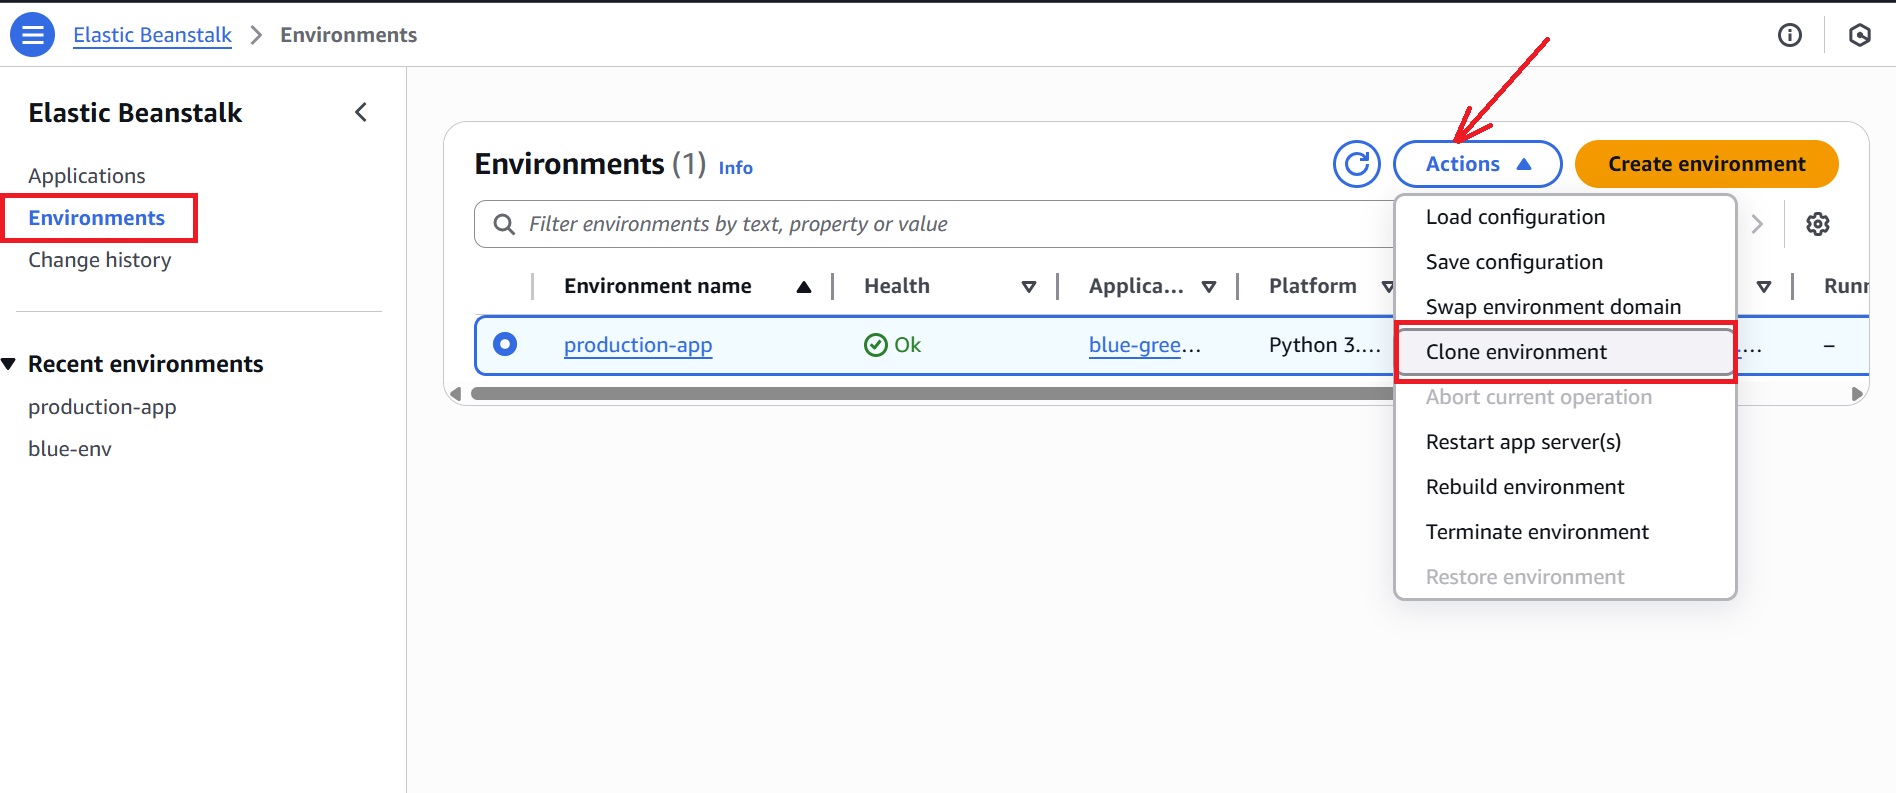
- In the Elastic Beanstalk console, go to the “Environments” tab, and select the Blue environment (‘production-app’ in our tutorial).
- Click the Actions dropdown and choose the Clone environment.
- In the cloning process, you’ll be prompted to provide a name for the new (Green) environment (for example: new-green-app).
- Leave the Domain name blank for an autogenerated value.
- Confirm that the platform (e.g., Python) matches the Blue environment, and select the “Service role” used earlier in the Blue environment.
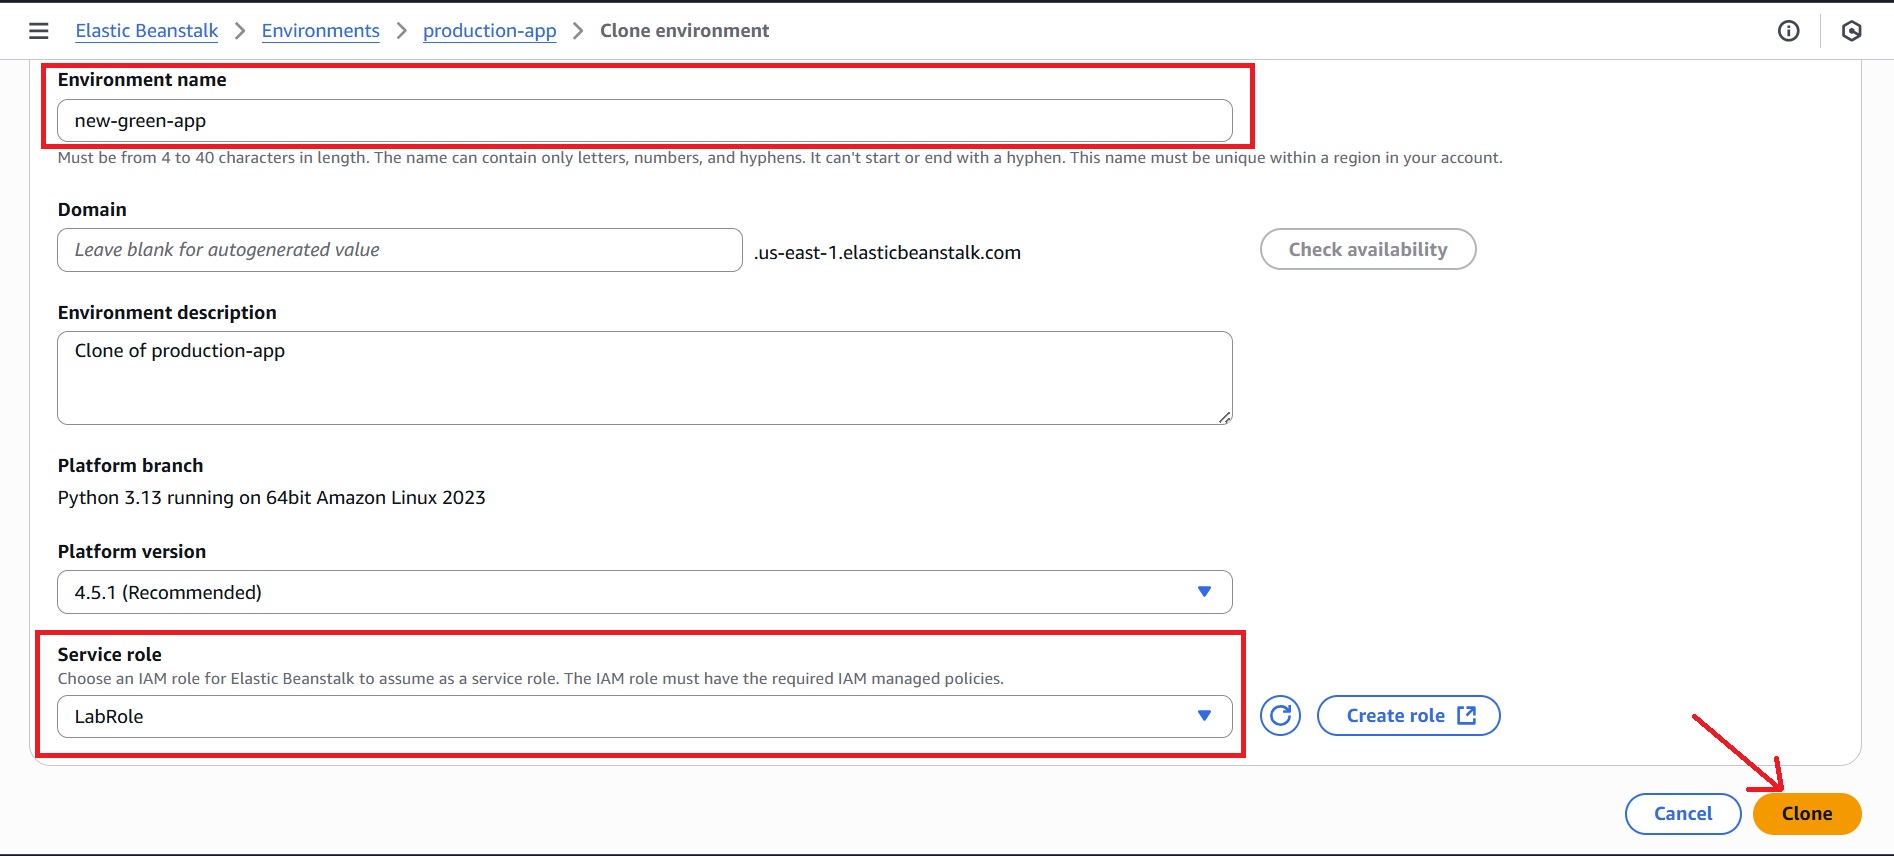
- Click on “Clone” to create the Green environment and wait until it is successfully launched.
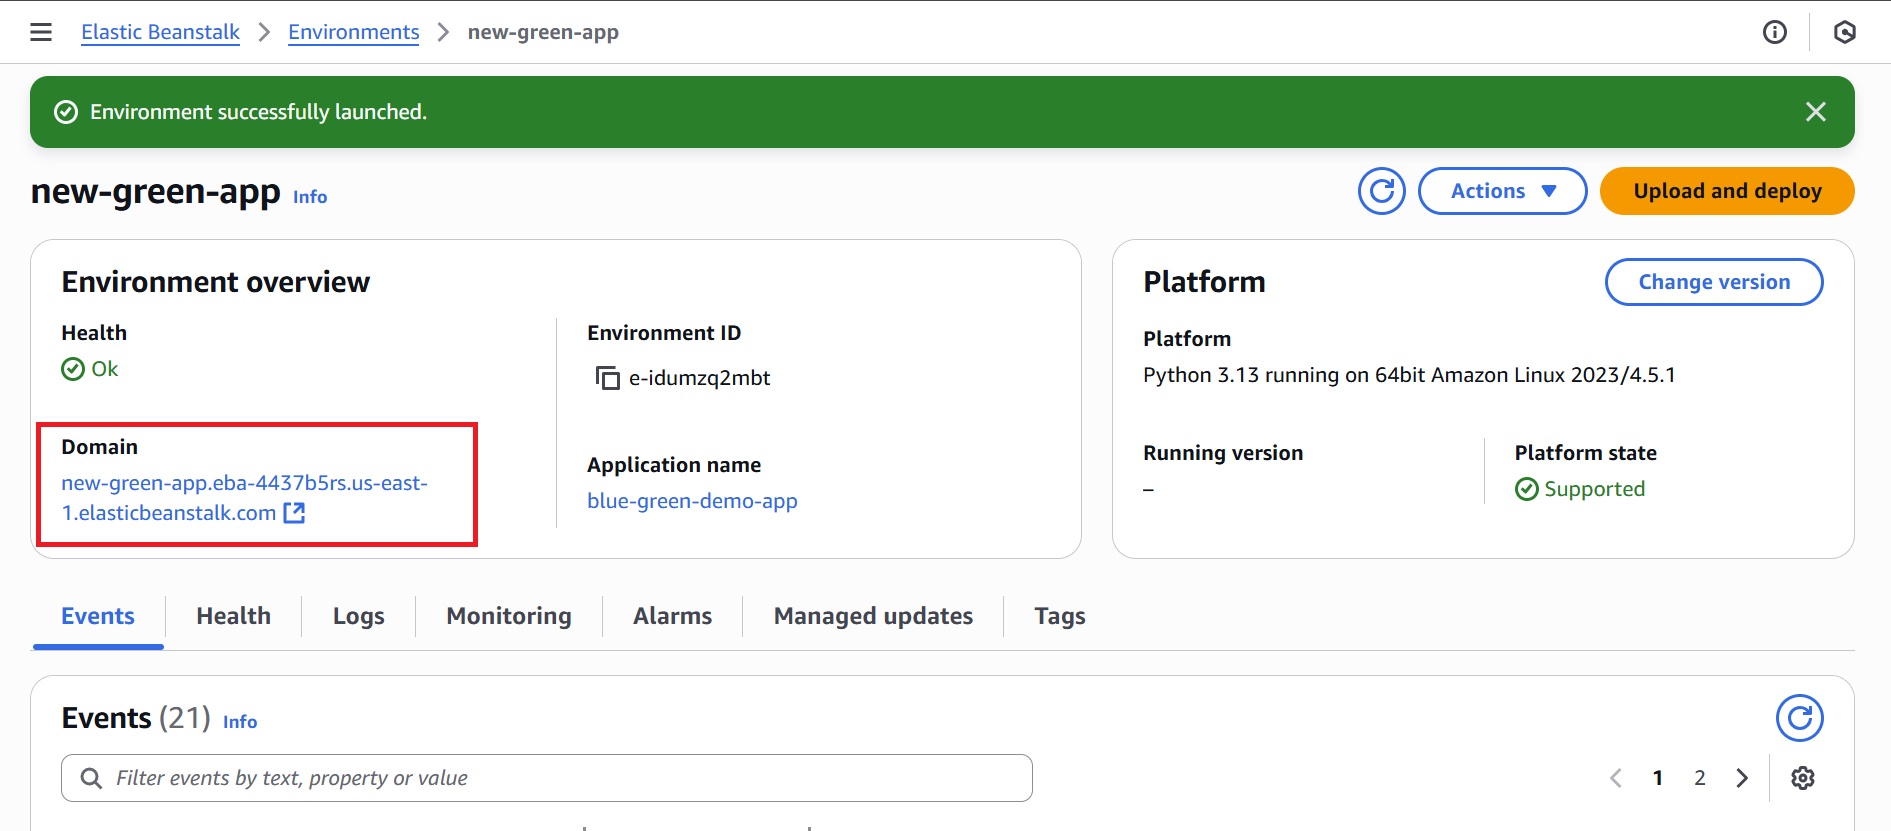
- Once the Green environment is ready, access its URL (new-green-app.eba-4437b5rs.us-east-1.elasticbeanstalk.com) to perform functional tests and verify everything works as expected.

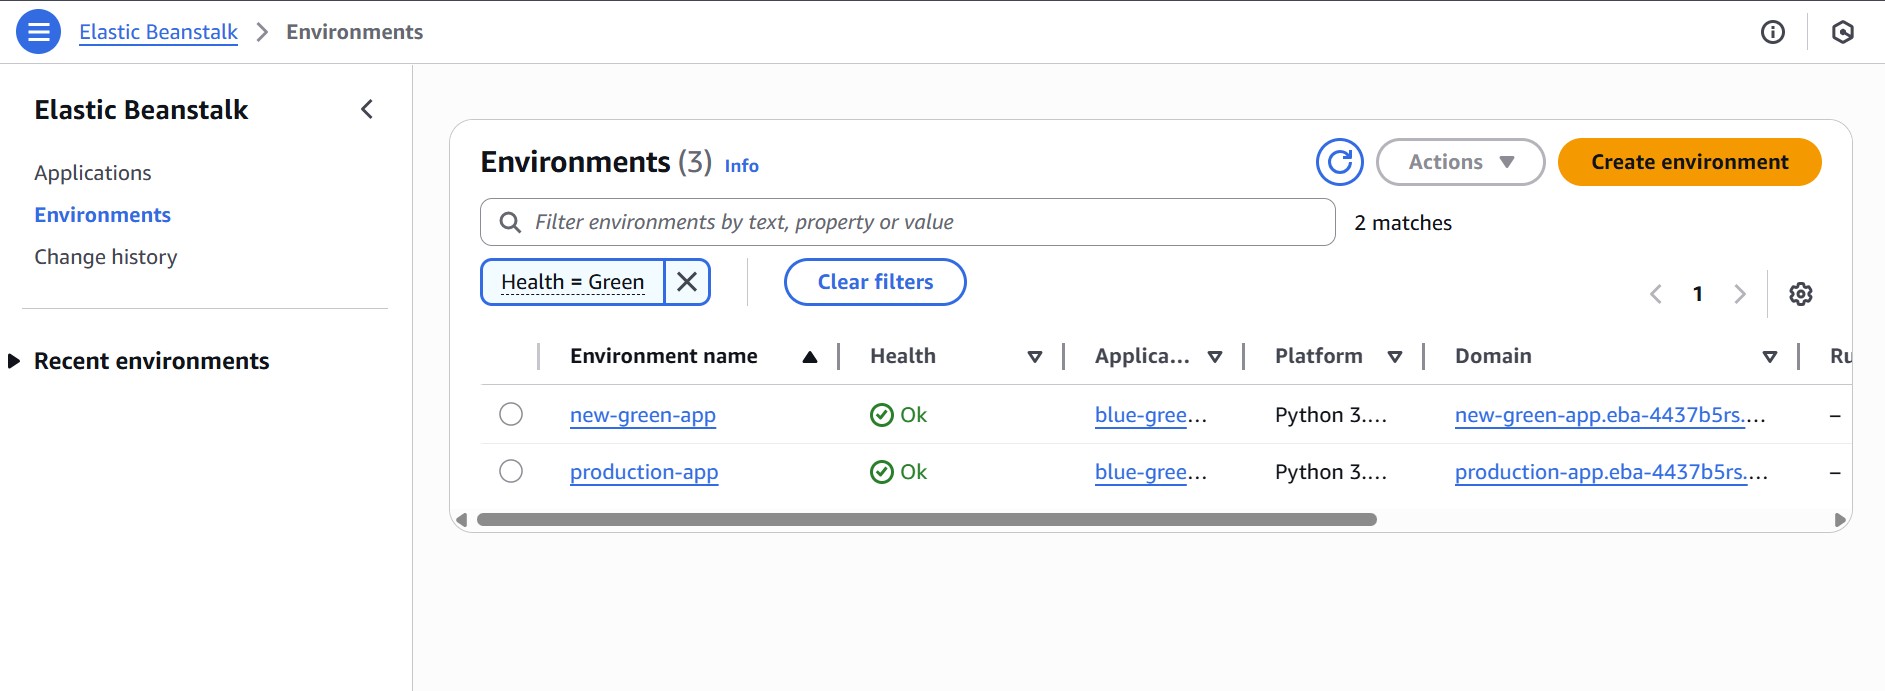
Here are our two (Blue and Green) environments :
Step 3: Deploy the New Version of the Application to the Green Environment
After the Green environment is cloned from the Blue environment, it initially runs the same application version.
To test the updates, deploy the new version of the app to the Green environment. This ensures the application is fully tested and stable before it goes live.
3.1 Prepare the Updated Application Code
- Use the following example
application.pyto represent the updated version of the Sample application.
from flask import Flask, render_template_string

application = Flask(__name__)

@application.route('/')
def home():
    return render_template_string('''
        <!DOCTYPE html>
        <html>
        <head>
            <title>Updated AWS Python App</title>
            <style>
                body { font-family: Arial, sans-serif; padding: 40px; background-color: #f0f0f0; }
                h1 { color: #2e6da4; }
                ul { list-style-type: none; padding: 0; }
                li { margin: 10px 0; }
                a { color: #337ab7; text-decoration: none; }
                a:hover { text-decoration: underline; }
                .container { background: white; padding: 30px; border-radius: 10px; box-shadow: 0 0 10px #ccc; }
            </style>
        </head>
        <body>
            <div class="container">
                <h1>This is the Updated Version</h1>
                <p>Your updated Flask application is now live in the AWS Elastic Beanstalk environment.</p>
                <p>This deployment demonstrates a successful version update using Blue-Green strategy.</p>

                <h2>Explore More</h2>
                <ul>
                    <li><a href="https://docs.aws.amazon.com/elasticbeanstalk/latest/dg/Welcome.html" target="_blank">Elastic Beanstalk: Getting Started</a></li>
                    <li><a href="https://docs.aws.amazon.com/elasticbeanstalk/latest/dg/concepts.html" target="_blank">Platform & Deployment Concepts</a></li>
                    <li><a href="https://docs.aws.amazon.com/elasticbeanstalk/latest/dg/create-deploy-python-django.html" target="_blank">Launch Django with Beanstalk</a></li>
                    <li><a href="https://docs.aws.amazon.com/elasticbeanstalk/latest/dg/create-deploy-python-flask.html" target="_blank">Run Flask on AWS</a></li>
                    <li><a href="https://docs.aws.amazon.com/elasticbeanstalk/latest/dg/customize-containers-ec2.html" target="_blank">Tune Your Python Environment</a></li>
                    <li><a href="https://docs.aws.amazon.com/elasticbeanstalk/latest/dg/using-features.logging.html" target="_blank">Inspect & Analyze Logs</a></li>
                </ul>
            </div>
        </body>
        </html>
    ''')

if __name__ == "__main__":
    application.run(debug=True)
Create a simple requirements.txt file:
flask- Save the
application.pyandrequirements.txt filesin a folder; for example, updated-green-app. - Create a ZIP file containing only the files inside the folder.
3.2 Upload and Deploy to Green Environment
- Select the Green environment from application environments in the Elastic Beanstalk console.
- Click “Upload and Deploy” to upload the updated application package.
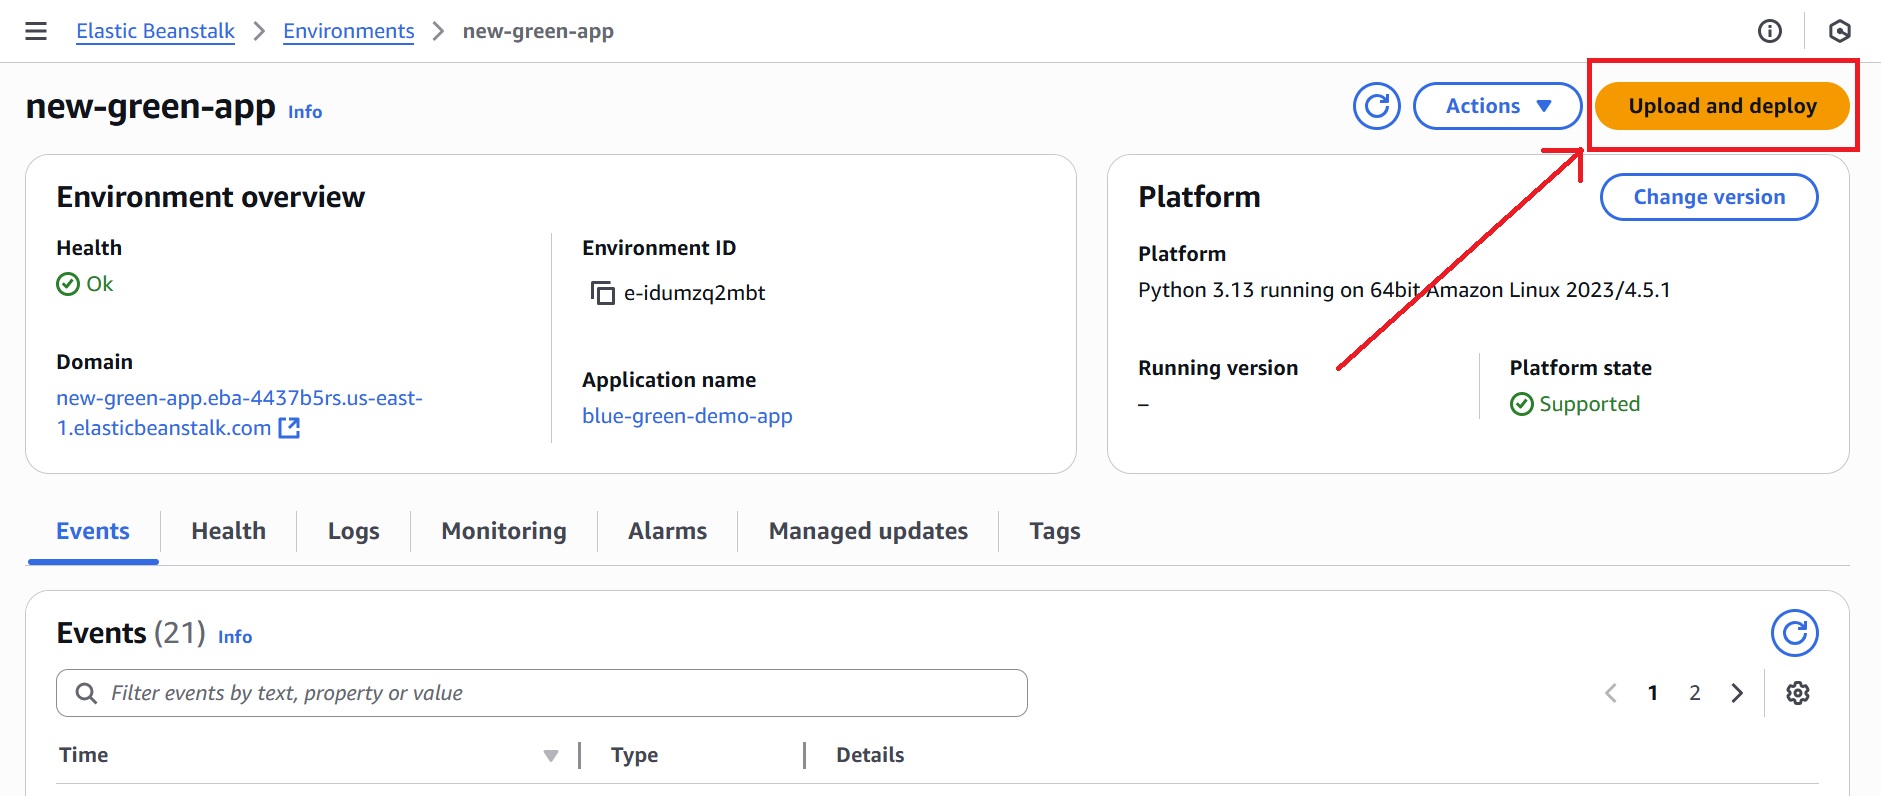
- Then, choose the updated ZIP file and give the ‘Version label’ a meaningful name.
- Choose Deployment preferences (optional) and click Deploy.
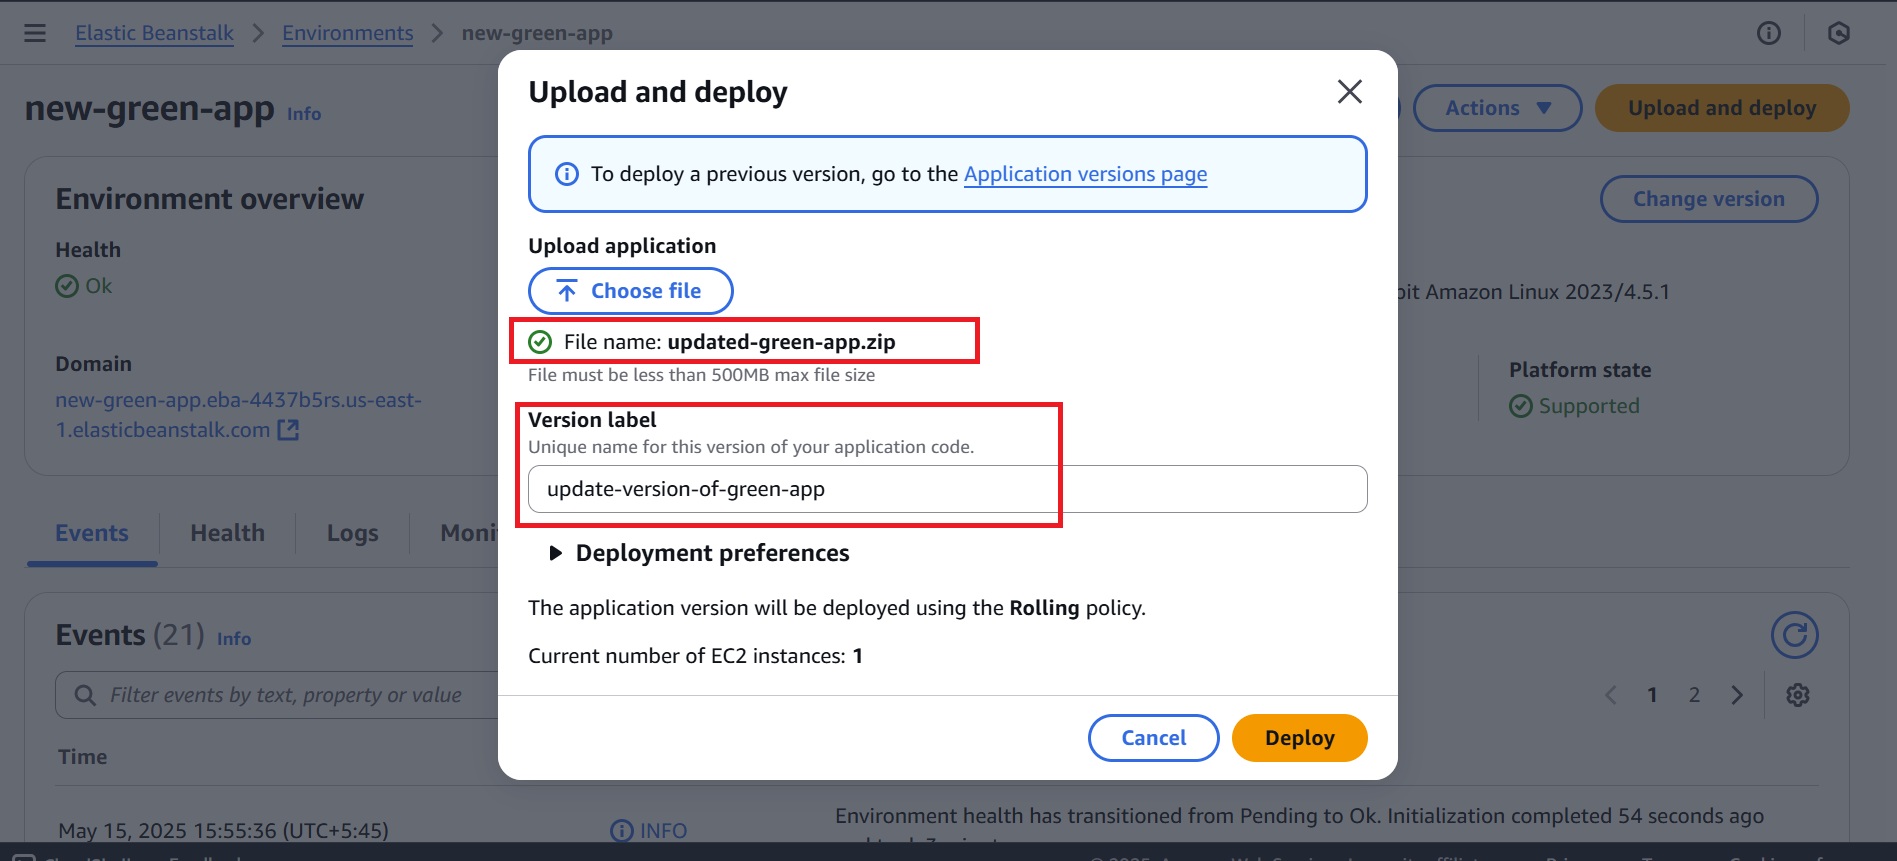
- Wait for the updated application version to upload and deploy successfully.
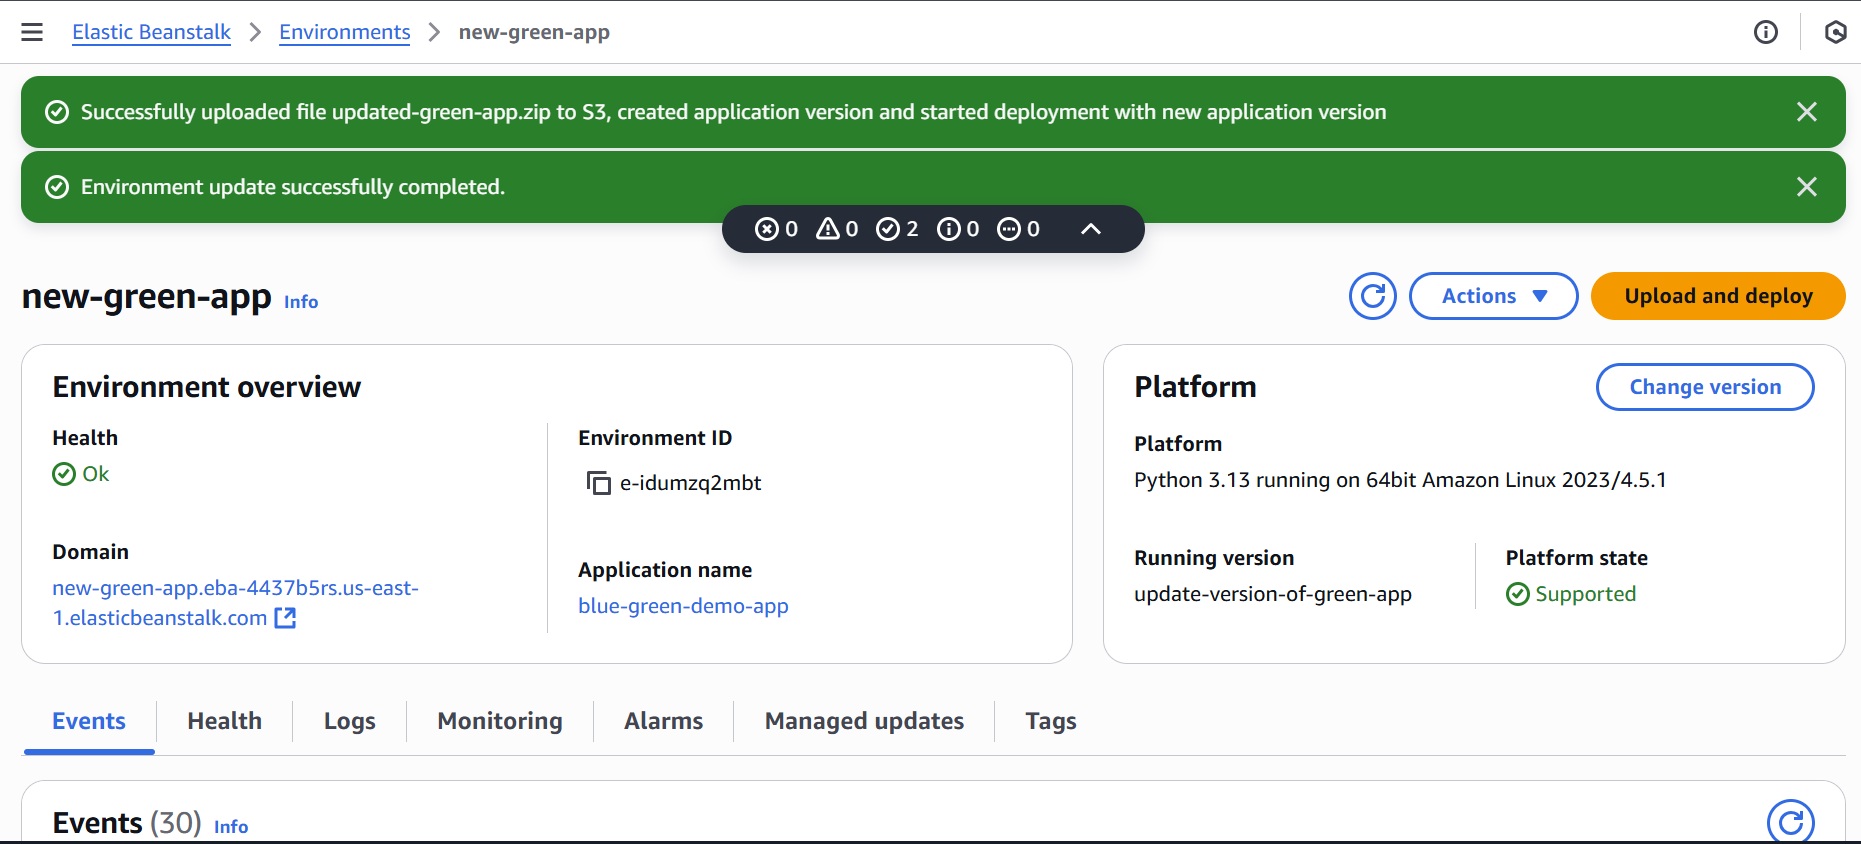
Step 4: Test the Green Environment
Testing ensures the new version works as expected under real-world conditions before switching traffic to the Green environment.
- In the Elastic Beanstalk console, navigate to the Green environment (example: new-green-app).
- Access the Green environment’s domain URL to verify that the updated deployment was successful and the changes appear as expected.
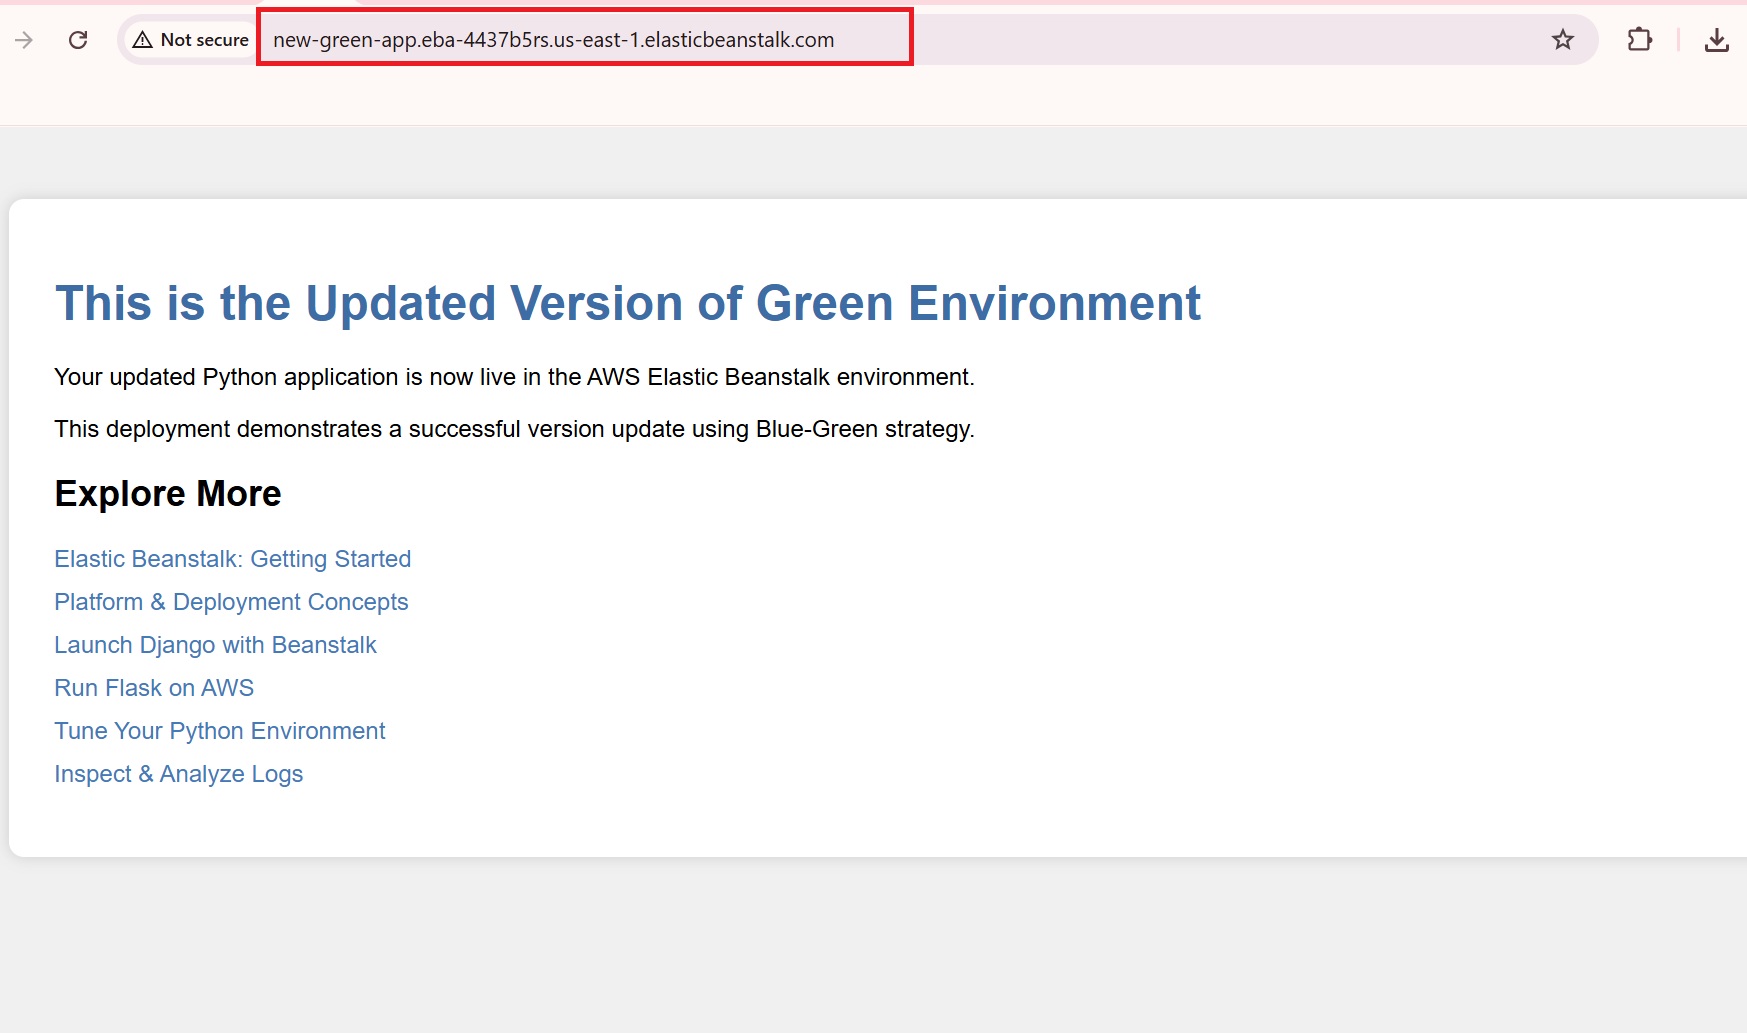
The update is successfully deployed in the green environment.
Additionally, you can use CloudWatch to monitor performance metrics and tools like Apache JMeter for load testing.
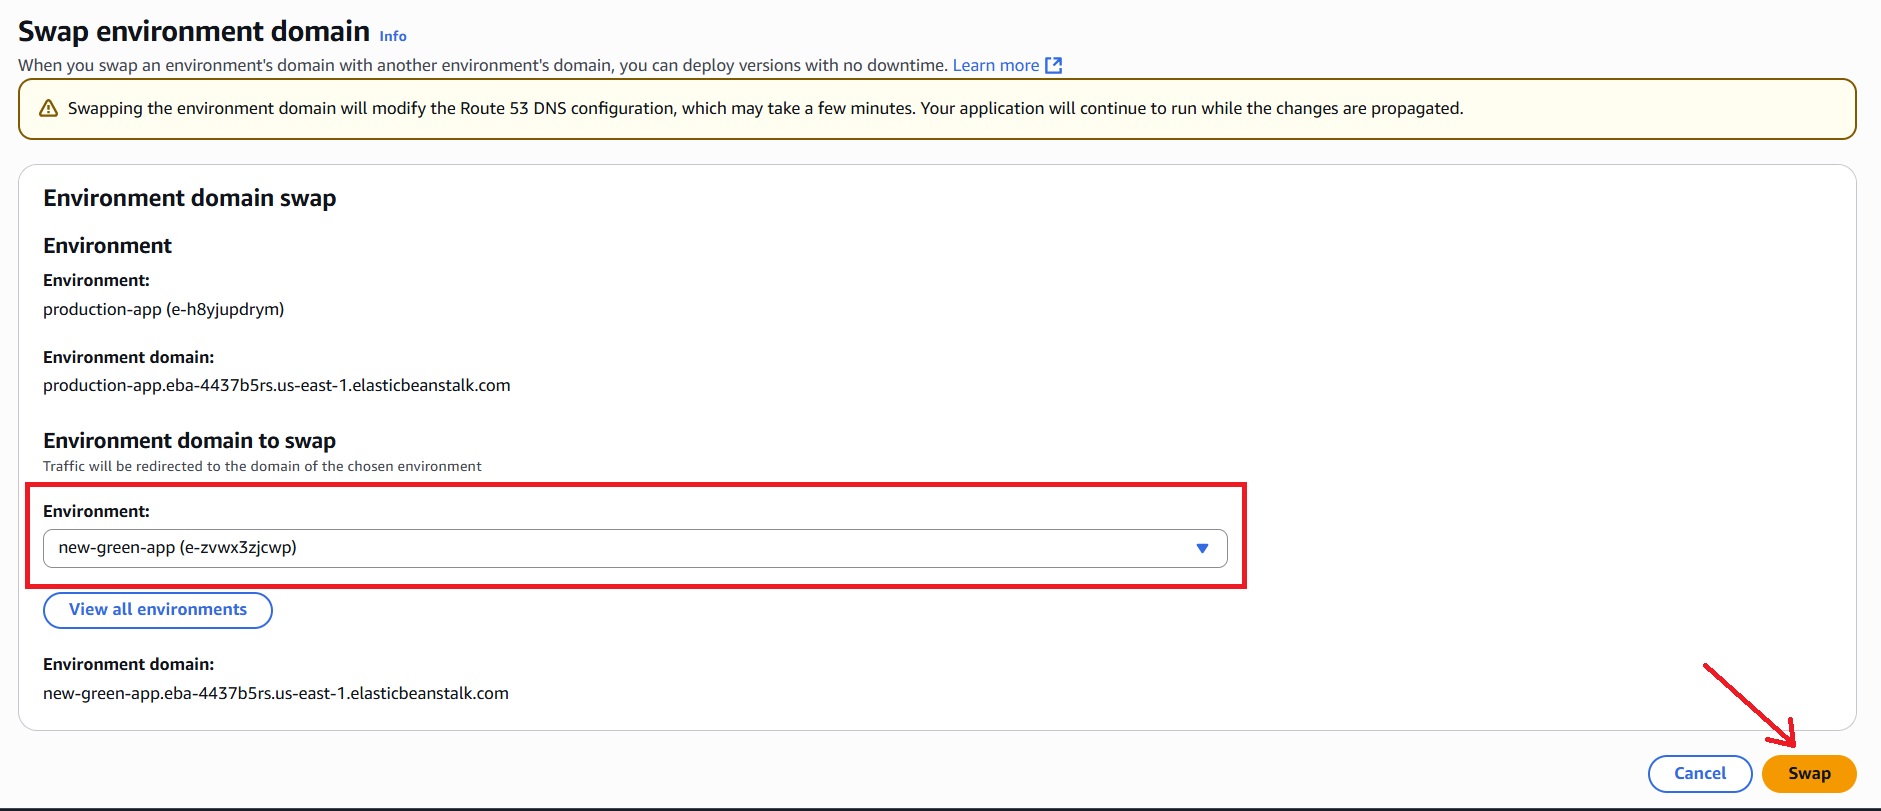
Step 5: Swap Environment URLs
Swapping the URLs allows you to make the Green environment live while keeping the Blue environment as a backup. This minimizes downtime and ensures a smooth transition.
To swap the URLs:
- Navigate to “Environments” in the Elastic Beanstalk console, and select the Blue environment (i.e., production-app in our tutorial).
- Click “Actions” > “Swap environment domain”.
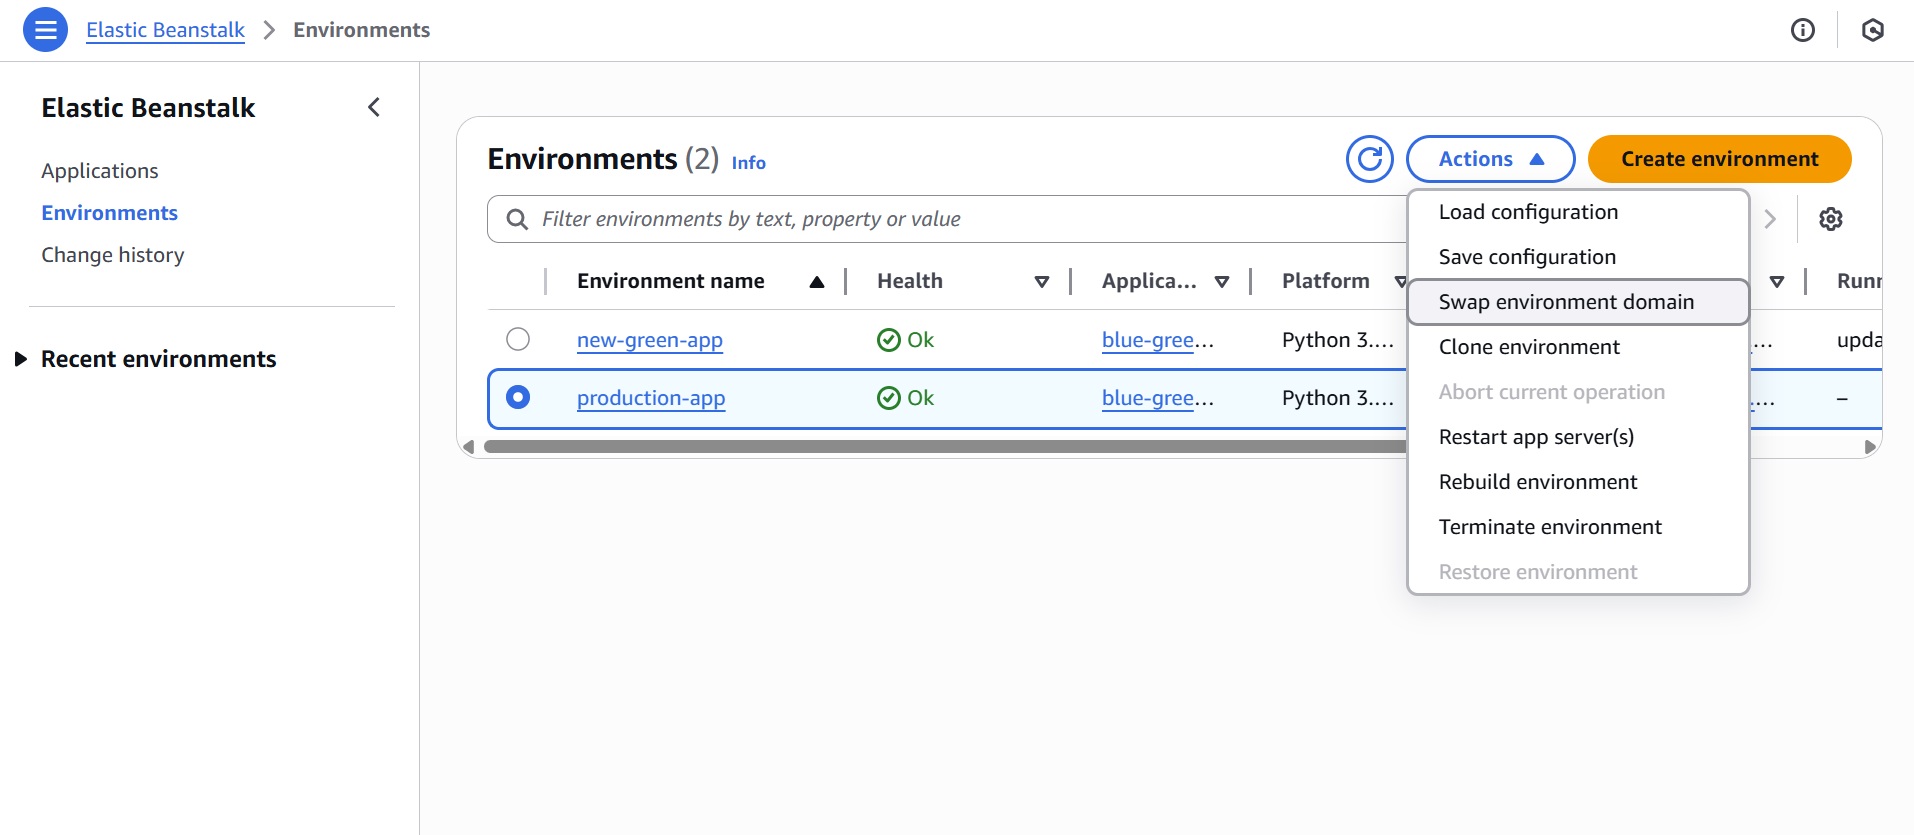
- In the Swap environment domain dialog, select the Green environment (new-green-app) to swap with.
- Click “Swap.”
Confirmation Of URL Swap
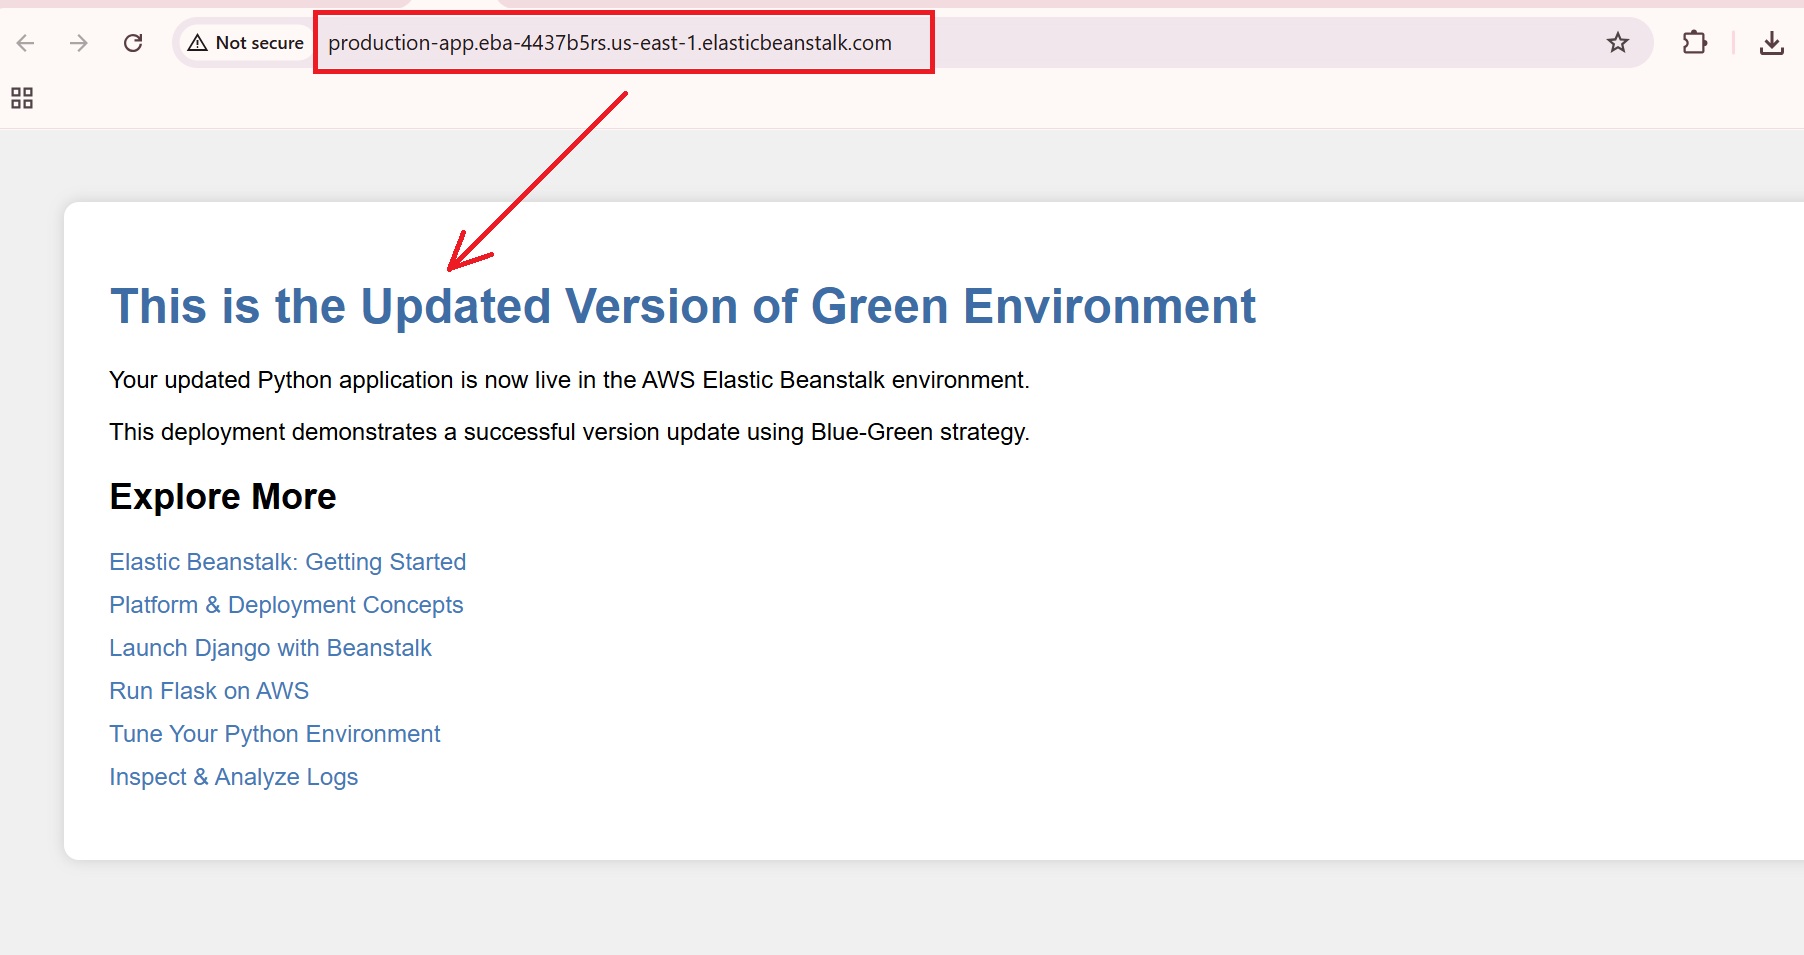
After a successful swap, the Green environment (new-green-app) will now use the URL of the Blue environment (production-app.eba-4437b5rs.us-east-1.elasticbeanstalk.com).
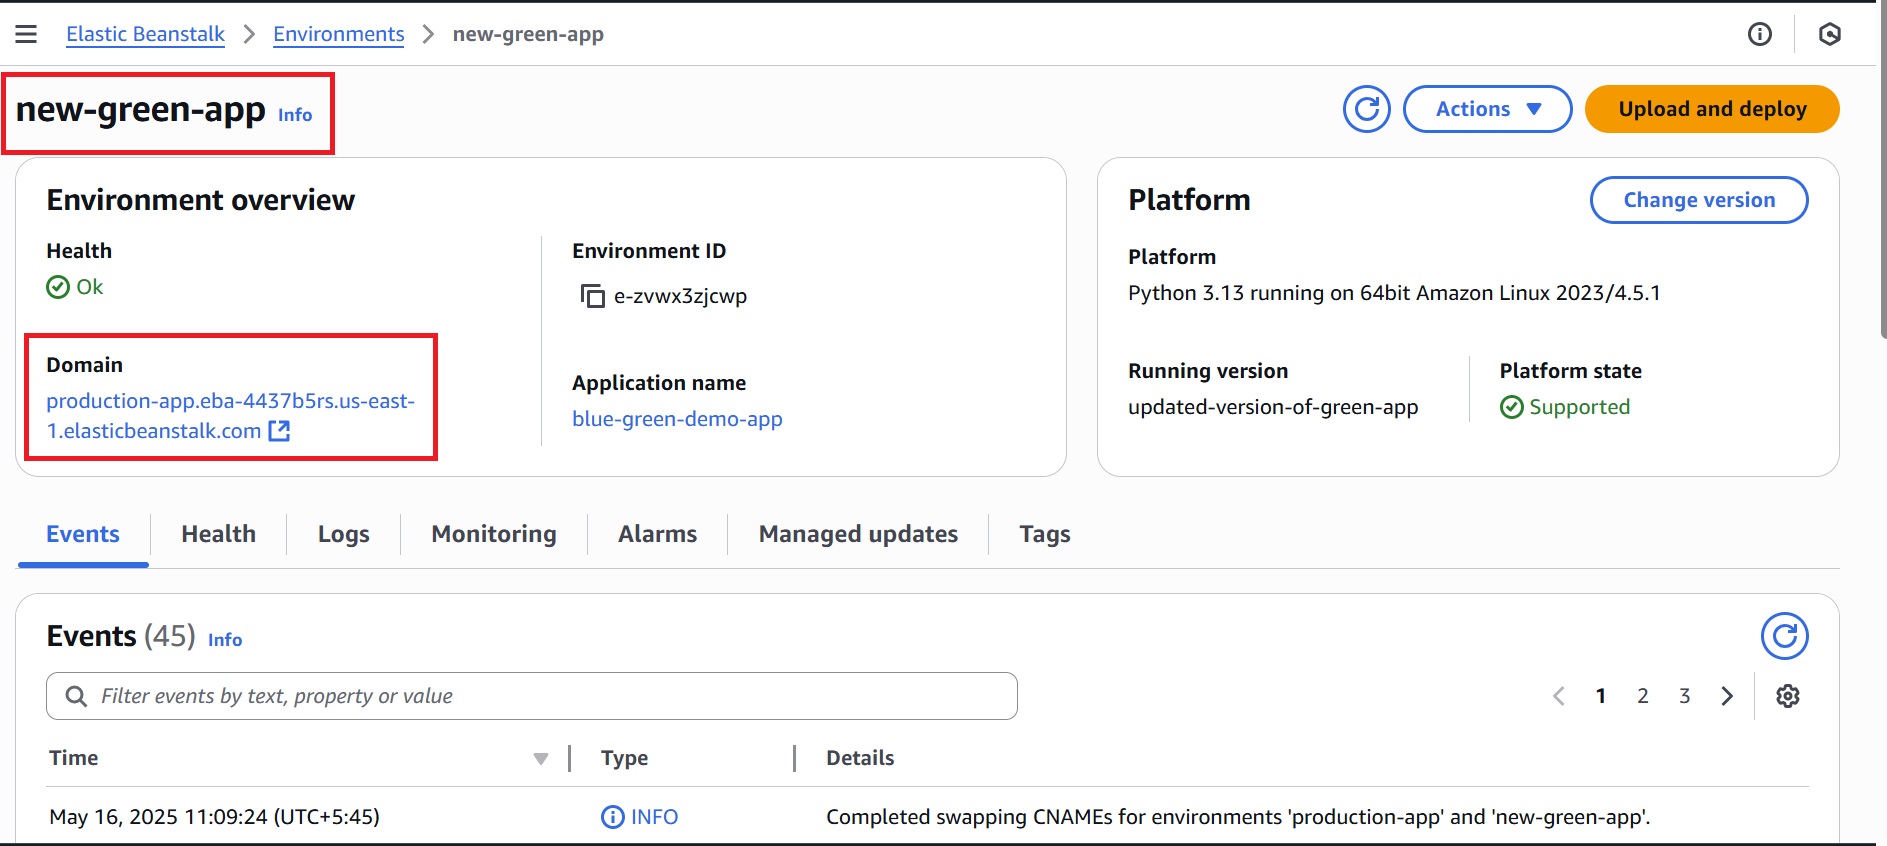
- The swapped URL points to the Green environment and displays the updated version.
Note: As for the Blue environment (production-app), it is assigned the previous URL of the Green environment (new-green-app.eba-4437b5rs.us-east-1.elasticbeanstalk.com).
Step 6: Monitor Post-deployment and Clean Up
After going live, monitor the Green environment using CloudWatch and Elastic Beanstalk’s health dashboard to ensure everything runs smoothly. If needed, you can quickly roll back by swapping URLs. Once stable, clean up unused resources—like the old Blue environment—to save costs.
Conclusion
Blue-green deployment in AWS Elastic Beanstalk is configured by maintaining two separate environments—Blue for live traffic and Green for testing updates. Updates are deployed and validated in the Green environment first. Once confirmed, traffic is smoothly shifted from Blue to Green, enabling zero downtime application updates.
This approach isolates changes, allowing thorough validation before switching user traffic. Elastic Beanstalk’s automation of environment setup, traffic routing, and health monitoring reduces manual effort and downtime, making deployments safer, more reliable, and easier to manage.


