Docker has changed the way we build and run applications by using lightweight, portable containers. These containers include everything an app needs to work. However, to use Docker effectively, it’s essential to understand how containers communicate with each other.
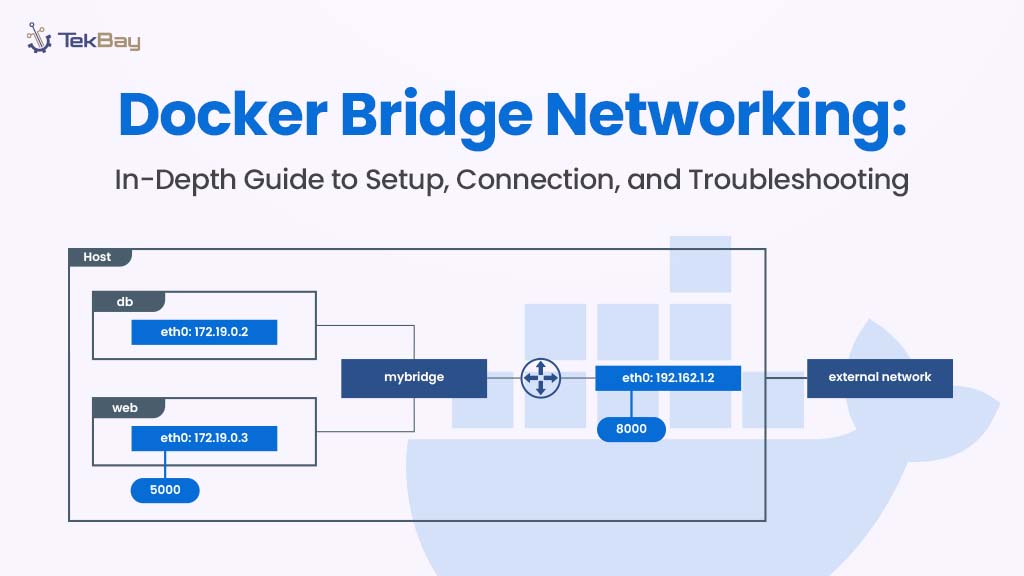
This blog focuses on Docker bridge networking—the default method by which containers connect on a single machine.
We will walk you through the steps for creating custom bridge networks, connecting containers, testing if they can communicate with each other, and resolving common network issues. Whether you’re setting up a small project or solving connection issues, knowing how Docker networking works will help you get the job done.
Prerequisites
- Docker Engine: Ensure that Docker Engine is installed and running on your machine.
- Docker Compose: Docker Compose should be installed and operational for managing multi-container applications.
- Basic Networking Knowledge: A fundamental understanding of networking concepts will help you grasp how containers communicate.
- Docker Fundamentals: Familiarity with Docker images, containers, and basic Docker commands is essential for following along.
Setting Up Docker Networks (Bridge Network)
Step 1: Creating a Custom Docker Bridge Network
While Docker’s default bridge network works for simple setups, creating a custom bridge network allows you to define specific subnets, improve isolation, and enable DNS-based service discovery for more complex scenarios.
You can create custom networks using the following command:
docker network create --driver bridge Customize the Bridge Network
If you need more control over your network configuration, you can customize it with specific options like --subnet and --gateway. This is useful when you need to manage IP addressing and network routing.
docker network create --driver bridge --subnet 172.20.0.0/16 \
 --gateway 172.20.0.1 my_custom_network
docker network create --driver bridge --subnet 172.20.0.0/16 \
 --gateway 172.20.0.1 my_custom_network
Step 2: List Available Docker Networks
Once you’ve created your custom network, you can list all networks to verify your new bridge network:
docker network ls
Step 3: Setting Up Docker Bridge Networks
To verify the details of your custom bridge network, such as connected containers and network settings, run the following command:
docker network inspect my_custom_network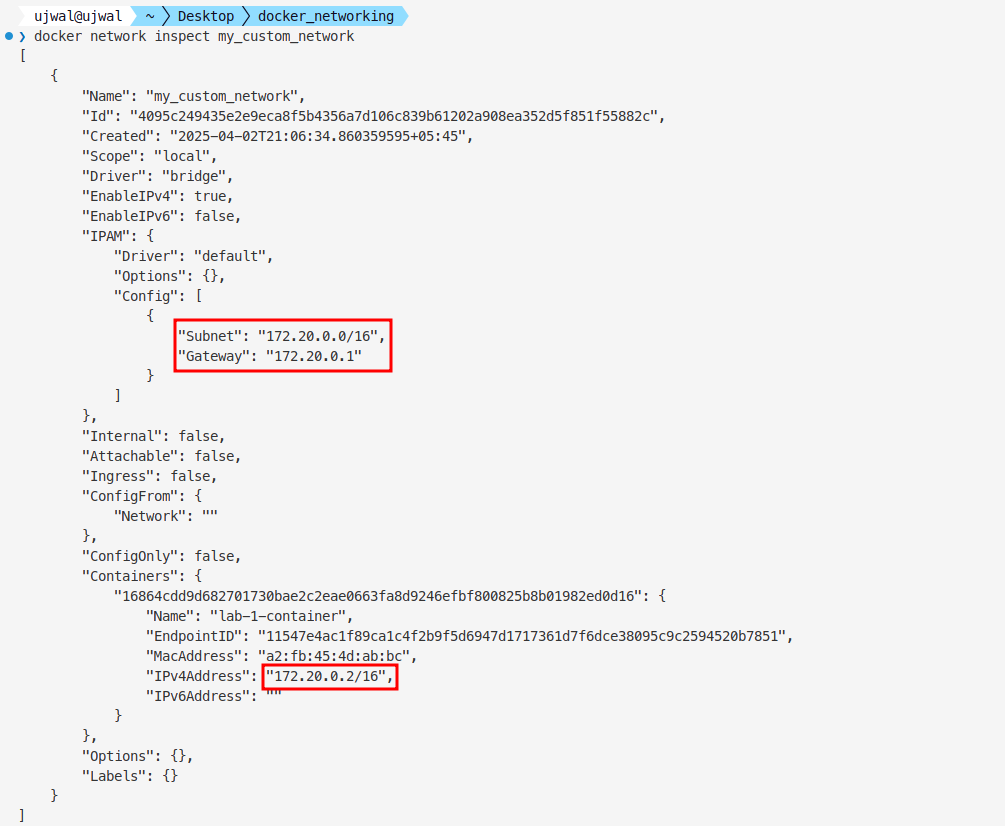
The above command returns details such as connected containers, IP addresses, and subnet information, which are crucial for diagnosing connectivity issues.
Step 4: Connect and Disconnect Containers
Once your custom Docker bridge network is created, you may need to dynamically connect or disconnect containers. This is especially useful for managing multiple containers without needing to restart them.
Connect Containers
To add a container to your custom network, use the following command:
docker network connect my_custom_network <container_name>
For example, you can connect netlab-1 and netlab-2 to your network using:
docker network connect my_custom_network netlab-1
docker network connect my_custom_network netlab-2
Disconnect Containers
To remove a container from the network, use the following command. For instance, to disconnect netlab-1 and netlab-2 from your network, use:
docker network disconnect my_custom_network netlab-1
docker network disconnect my_custom_network netlab-2
User-defined networks simplify container communication with DNS-based service discovery, making it easier for containers to locate each other by name.
Test Container Connectivity
Once your custom Docker bridge network is set up and containers are connected, you’ll need to test their ability to communicate.
1. Create a Network and Connect Containers
First, let’s create a network that both containers will share netlab-1 and netlab-2.
docker network create <name_of_network> -d bridge2. Connect Containers to the Network
Next, connect the containers to this network. You can connect one or more containers as needed:
docker network connect shared-network netlab-1
docker network connect shared-network netlab-2
This ensures that both containers are part of the same custom bridge network.
3. Verify Connectivity with Ping
To verify that the containers can communicate with each other, use the ping command inside one of the containers:
ping <server_ip> -c <number_of_packets>
Troubleshooting Docker Networks
If there are issues with your Docker network, there are several methods you can use to diagnose the problem:
1. Inspect the network: Verify the network configuration and identify any issues with IP addressing or connected containers.
docker network inspect shared
2. Check container logs: If containers aren’t communicating, review their logs for any errors that could help identify the problem.
docker logs netlab-1
docker logs netlab-2
3. Use network tools: If you still face issues, you can run tools like tcpdump inside containers to analyze network traffic and identify where the issue lies.
docker exec -it my_container tcpdump -i eth0
The network traffic captured includes: a brief HTTP interaction with a redirect response, an ARP resolution request and reply, and local network service discovery queries using mDNS.
Conclusion
Docker networking gives you flexible and powerful ways to let containers talk to each other. In this blog, we focused on bridge networks, which are great for connecting containers on the same machine. By using custom networks, you can control how containers connect and communicate.


