Imagine a world where your on-premises network seamlessly interacts with the cloud, and your applications can effortlessly leverage both environments.
You’re in the right place if you are thinking of securely connecting your on-premises infrastructure to AWS.
Our three-part blog series will walk you through the following:
- Part 1: Set Up a Site-to-Site VPN.
- Part 2: Configure AWS Managed Microsoft AD as a Domain Controller and manage On-prem devices.
- Part 3: Set Up AWS SSO with Managed AD
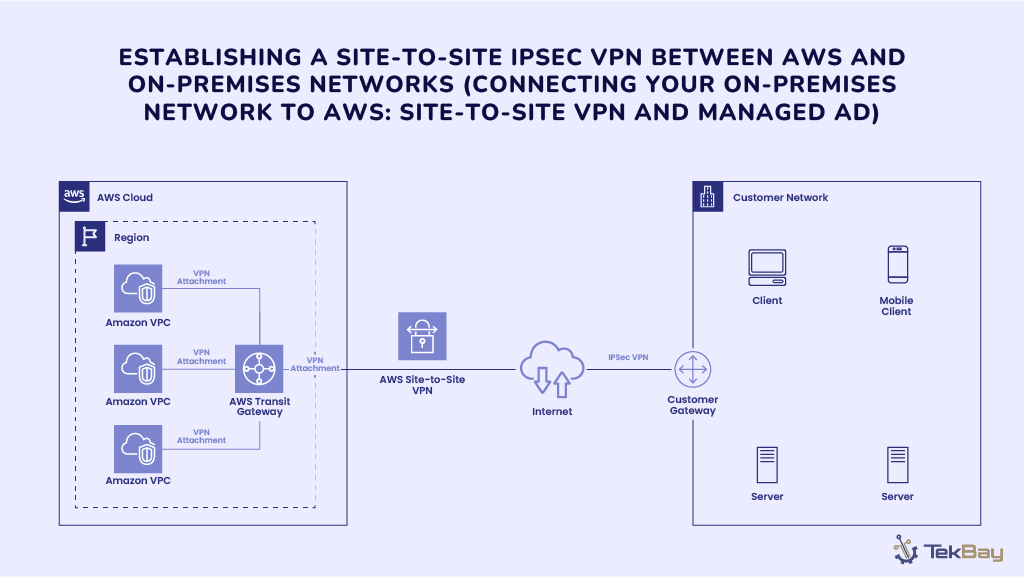
This blog covers Part 1 of the step-by-step series, which covers setting up a Site-to-Site VPN using a Fortinet firewall and AWS Transit Gateway. This ensures you establish a secure and effective connection for your cloud resources.
In This Guide, You Will Learn:
- Create a VPC and subnet setup for isolated environments.
- Configure a Site-to-Site VPN between Fortinet and AWS Transit Gateway.
- Establish secure, private connections for your applications and services.
Why Use a Site-to-Site VPN with AWS Transit Gateway?
Using a Site-to-Site VPN with AWS Transit Gateway allows you to link your on-premises network to AWS securely and efficiently.
Transit Gateway works like a central hub, connecting multiple VPCs so you don’t have to manage each individually. Its win-win factors make it demanding: It is cost-effective, secure, and simple to scale as your business grows.
Integrating a Fortinet firewall adds an extra layer of security, creating a secure environment that mirrors the security controls of an internal network.
Prerequisites
You will require the following:
- Fortinet FortiGate firewall with necessary licenses and firmware.
- AWS account with permissions to manage VPC, VPN, and Transit Gateway configurations.
- Basic networking and VPN knowledge.
- Terraform installed for infrastructure-as-code deployment.
Some Key Concepts Related To AWS VPNs
- Customer Gateway (CGW): Your on-premises device or endpoint (in this case, the Fortinet FortiGate firewall) within AWS, which consists of information about the external device, including IP address and BGP configurations.
- Transit Gateway (TGW): An AWS network that connects multiple VPCs and on-premises networks.
- Virtual Private Gateway (VGW): A dedicated VPN endpoint typically used when linking a single VPC to an on-premises network. Since it connects only one VPC at a time, we will be using AWS Transit Gateway, which allows multiple VPCs and on-premises networks to be connected.
- VPN Connection: An encrypted tunnel that allows safe data transmission between your on-premises network and AWS.
Step 1: Creating a VPC (Virtual Private Network) And Subnet
Let’s start with creating a new VPC. VPC in AWS is like our private data center in the cloud, giving us complete control over our virtual networking environment. Think of it as a secure, isolated section of the AWS cloud where we can launch our EC2 instances, database, and other resources.
Use the block of Terraform code below to create the VPC and Subnet.
provider "aws" {
    region = "us-east-1"
}
module "vpc" {
  source  = "terraform-aws-modules/vpc/aws"
  version = "5.12.0"

name = "my-vpc"
cidr = "172.31.0.0/16"
azs = ["us-east-1a","us-east-1b"]
public_subnets = ["172.31.1.0/24"]
private_subnets = ["172.31.20.0/24","172.31.21.0/24"]
enable_dns_support = true
enable_dns_hostnames = true
}
The above Terraform code will create a VPC with a CIDR of 172.31.0.0/16 in two Availability zones and two private and one public subnet.
Note: Ensure the chosen CIDR range does not overlap with your on-premises network.
Step 2: Creating and Attaching Internet Gateway and Adding Route for Public Subnet
Let’s create an Internet Gateway and attach it to our public subnet. Then, we update our public subnet route table to route traffic to the Internet Gateway for the public subnet.
resource "aws_internet_gateway" "igw" {
    vpc_id = module.vpc.vpc_id
    tags = { Name = "my-igw" }
}

resource "aws_route_table" "public" {
    vpc_id = module.vpc.vpc_id
    route {
        cidr_block = "0.0.0.0/0"
        gateway_id = aws_internet_gateway.igw.id
    }
    tags = { Name = "public-route-table" }
}

resource "aws_route_table_association" "public" {
    subnet_id      = module.vpc.public_subnets[0]
    route_table_id = aws_route_table.public.id
}
Step 3: Create a Route table for Private Subnet and Set NAT Gateway
Now, let’s create a NAT and attach it to our private subnet so that the resources in our private subnet can communicate with the Internet.
3.1) Allocate an Elastic IP
resource "aws_eip" "nat" {
  vpc = true

  tags = {
    Name = "nat-eip"

  }
}
3.2) Create a NAT Gateway
resource "aws_nat_gateway" "nat" {
  allocation_id = aws_eip.nat.id
  subnet_id     = module.vpc.public_subnets[0]  # Typically, you put NAT Gateway in a public subnet

  tags = {
    Name = "my-nat-gateway"
  }
}
3.3) Update Route Table for Private Subnet
resource "aws_route_table" "private" {
  vpc_id = module.vpc.vpc_id

  route {
    cidr_block = "0.0.0.0/0"
    nat_gateway_id = aws_nat_gateway.nat.id
  }

  tags = {
    Name = "private-route-table"
  }
}

resource "aws_route_table_association" "private" {
  subnet_id      = module.vpc.private_subnets[0]
  route_table_id = aws_route_table.private.id
}
Step 4: Creating the AWS Transit Gateway
By creating a Transit Gateway, we can manage the VPC route through TG, which allows us to connect many VPCs to our On-prem VPN.
4.1) Create a Transit Gateway with the following codes:
resource "aws_transit_gateway" "example" {
  description = "Example Transit Gateway"
  amazon_side_asn = 64512

  tags = {
    Name = "example-tgw"
  }
}
4.2) Create a Transit Gateway Attachment:
resource "aws_transit_gateway_vpc_attachment" "example" {
  transit_gateway_id = aws_transit_gateway.example.id
  vpc_id = module.vpc.vpc_id
  subnet_ids = module.vpc.private_subnets

  tags = {
    Name = "example-tgw-attachment"
  }
}
Step 5: Create a Customer Gateway and VPN Connection
5.1) Customer Gateway and VPN Connection setup:
resource "aws_customer_gateway" "example" {
bgp_asn = 65000
ip_address = "203.0.113.12" # Replace with your on-premises public IP
type = "ipsec.1"
tags = {
Name = "example-customer-gateway"
}
}
resource "aws_vpn_connection" "example" {
vpn_gateway_id = aws_vpn_gateway.example.id
customer_gateway_id = aws_customer_gateway.example.id
type = "ipsec.1"
static_routes_only = true
tags = {
Name = "example-vpn-connection"
}
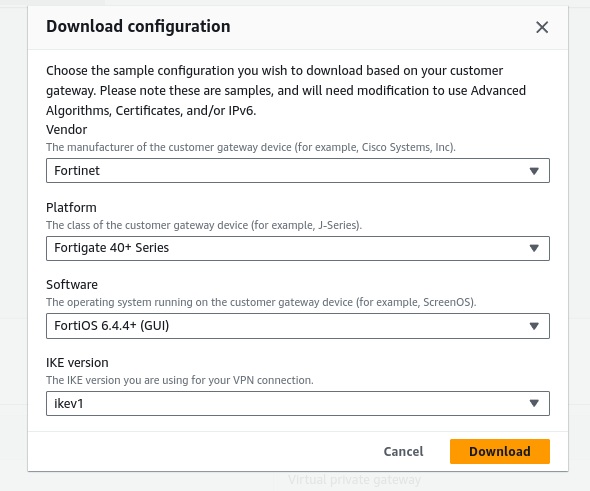
}5.2) Download VPN Configuration:
Once the VPN connection is created, select it and click Download Configuration. Choose Fortinet as the vendor and download the configuration file.
Step 6: Configuring Fortinet Firewall
6.1) Login to FortiGate: Access the FortiGate web interface using your web browser.
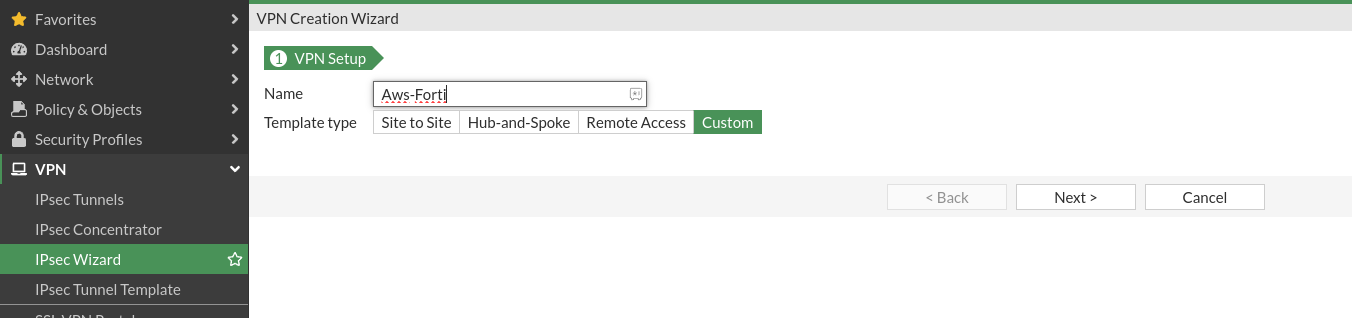
6.2) Configure Phase 1 (IKE):
- Go to VPN > IPsec Wizard.
- Select Custom and provide a name for the VPN.
- Set Remote Gateway to the public IP of the AWS VPN endpoint.
- Configure the Authentication settings using the information from the AWS VPN configuration file.
- Select Interface as your ISP WAN Interface and select local gateway
- Set the IKE Version to match the version specified in the AWS configuration file.
- Configure the Encryption and Authentication algorithms as specified in the AWS configuration file.
- Click Next to proceed.

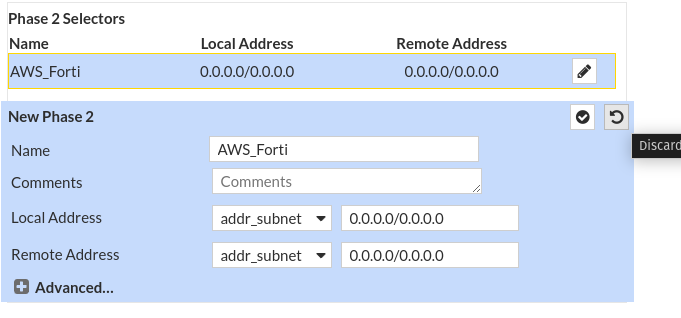
6.3) Configure Phase 2 (IPsec):
- Configure the Encryption and Authentication settings as specified in the AWS configuration file.
- Set the Local Subnet to the on-premises network and the Remote Subnet to the AWS VPC CIDR.
- Configure PFS settings if required.
- Click Next to proceed.
For Tunnel Interface Configuration:
- Go to Network > Interface.
- Select the ISP WAN and choose the tunnel interface.
- Configure the Tunnel Interface using the information from the AWS VPN configuration file from Step 3 in the config.txt file.
6.4) Configure Static Routes:
- Go to Network > Static Routes.
- Click Create New.
- Set the Destination to the AWS VPC CIDR.
- Set the Device to the VPN interface created in the previous steps, and click ‘Ok.’

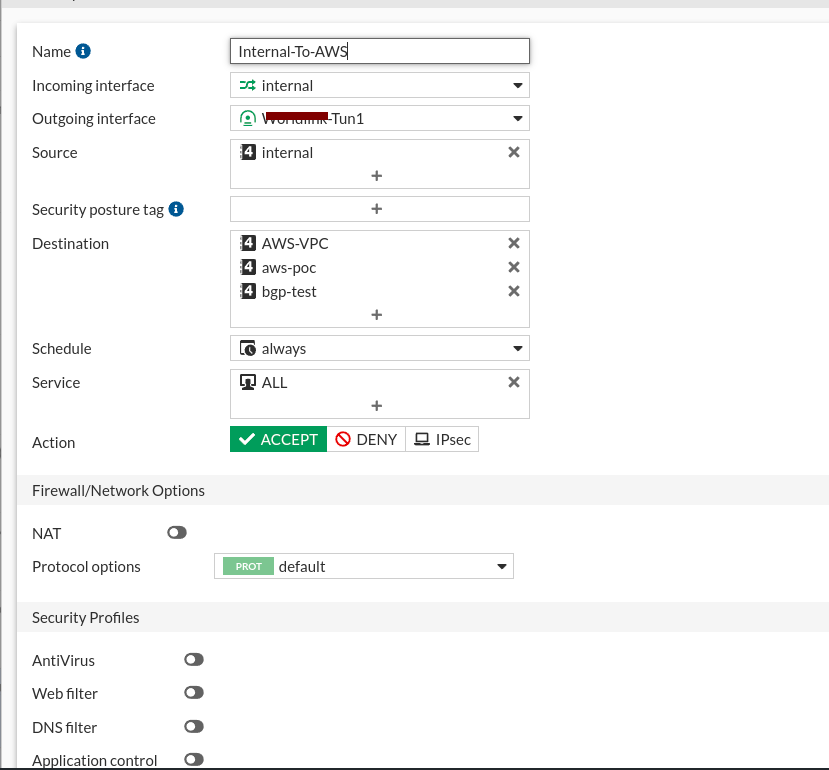
6.5) Configure Firewall Policies:
- Go to Policy & Objects > IPv4 Policy.
- Create a new policy to allow traffic from the on-premises network to the AWS VPC.
- Create another policy to allow traffic from the AWS VPC to the on-premises network.
- Click OK to save the policies.
Now that our Fortinet part is over, let’s head back to AWS to add a route to establish a network connection between AWS and on-prem.
Step 7: Completing the Fortinet to AWS VPN Setup
7.1) Adding routes
Go to the private subnet route table and add a route to your on-prem subnet through the transit gateway.

7.2) Adding a VPN attachment to the transit gateway
Go to the Transit gateway attachment and select your s2s VPN as an attachment.

7.3) VPN Tunnel Status Verification in AWS
After following the above steps, your Tunnel should be up and ready. To verify the Tunnel’s Status, go to S2S VPN and click on the VPN Connection and Tunnel Details.
Or, go to the FortiGate portal and IPsec VPN to see the status. It should be UP.

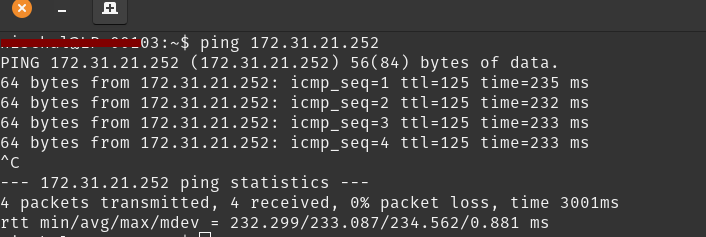
Step 8: Testing Connectivity with an EC2 Instance
Optionally, you can test the connection by deploying an EC2 instance in AWS and pinging it from your on-premises network.
Here is an example of an EC2 in a private subnet with which one can successfully ping from their on-prem network.
Conclusion
Setting up a Site-to-Site VPN between your Fortinet firewall and AWS Transit Gateway is easier than ever. This setup ensures a secure connection to smoothly transfer data and manage resources between your on-premises network and AWS.
In the next part of our series, we will cover how to configure AWS Managed AD as a Domain Controller and manage on-prem devices.
Please leave any questions or comments in the section below. Until next time, happy networking!


