Layer 2 attacks, which target the OSI model’s data connection layer, pose significant dangers to local area networks (LANs). Attackers frequently target this layer to exploit inherent vulnerabilities, most of which are associated with DHCP (Dynamic Host Configuration Protocol).
Whether it’s a DHCP starvation attack flooding your IP pool with bogus requests or a rogue DHCP server assigning malicious configurations, these scenarios can leave you scrambling to determine what went wrong.
This blog will explore these attacks and how they operate using a basic architecture. It will also discuss the mitigation techniques of Layer 2 attacks. Let’s get started!
Network Topology for Layer 2 Attack Simulation
This network architecture diagram illustrates a common setup for simulating or explaining a Layer 2 attack scenario, like DHCP starvation or a rogue DHCP attack.

The topology shows the attacker’s strategic location within the LAN for effective Layer 2 attacks.
The switch acts as a communication channel, linking all devices and allowing the attacker’s harmful activity to affect the victim and potentially corrupt the entire network.
Components
Below is an overview of the components and how they relate to each other:
1. DHCP Server (fa0/0):
- A legitimate DHCP server connected to the network through an interface fa0/0.
- It assigns IP addresses and other network configurations to devices on the LAN.
2. Switch:
A central network switch connects several devices in the LAN, including the DHCP server, attacker, and victim. Interfaces like e0/1, e0/2, and e0/0 represent the ports used for these connections.
3. Victim (eth0):
- A device (e.g., a client computer) connected to the network through an interface
eth0. - The victim relies on the DHCP server to obtain its network configuration.
4. Attacker (Kali the Attacker):
- A malicious entity is connected to the network via the switch at the interface
e0/2. - The attacker, represented as “Kali, the Attacker,” typically runs a penetration testing or hacking platform like Kali Linux, often used for network testing and exploitation.
Attack Scenario in the Topology
1. DHCP Starvation Attack:
The attacker bombards the DHCP server with requests using multiple spoofed MAC addresses, quickly exhausting the available pool of IP addresses. As a result, legitimate devices, including the victim, cannot obtain an IP address, disrupting their network connectivity.
2. Rogue DHCP Attack:
The attacker sets up a rogue (fake) DHCP server to respond to DHCP requests from devices, including the victim.
This manipulation causes the victim to receive incorrect network configurations, such as a gateway address redirecting traffic to the attacker’s workstation.
It allows the attacker to intercept, monitor, or redirect the victim’s network traffic for malicious purposes.
Prerequisites for Simulating and Testing Layer 2 Attacks
1. EVE-NG (Emulated Virtual Environment Next Generation)
a) Purpose: A powerful network emulator for creating complex, multi-vendor network topologies.
b) Usage:
- Simulate a network environment to test DHCP starvation and rogue DHCP attacks in a controlled setup.
- Practice and implement security features such as DHCP Snooping and ARP inspection on virtual network devices.
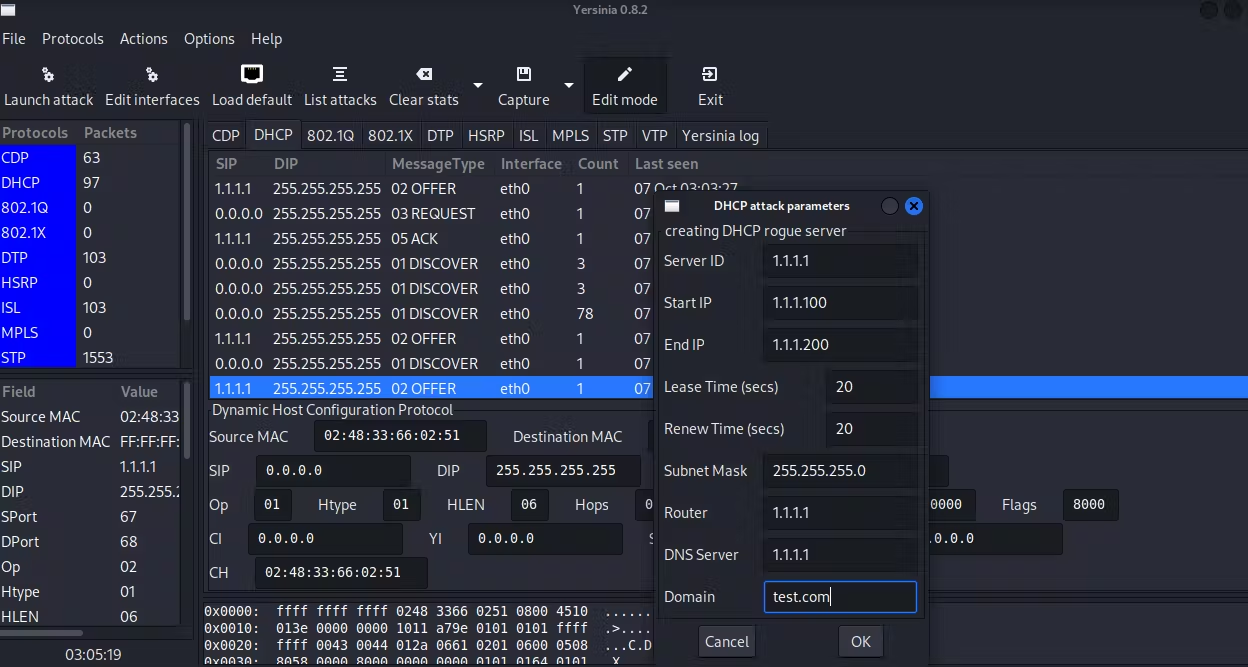
2. Yersinia
a) Purpose: A specialized penetration testing tool targeting Layer 2 protocols.
b) Usage:
- Execute attacks such as DHCP starvation, ARP spoofing, and STP manipulation.
- Test the resilience of networks against Layer 2 vulnerabilities and assess the effectiveness of countermeasures.
3. Ettercap
a) Purpose: A comprehensive tool for man-in-the-middle (MITM) attacks and network traffic manipulation.
b) Usage:
- Perform rogue DHCP server attacks to test client vulnerabilities and network defenses.
- Simulate ARP poisoning to intercept or manipulate network traffic as part of Layer 2 attack scenarios.
4. VirtualBox
a) Purpose: A virtualization tool to create and manage virtual machines (VMs).
b) Usage:
- Set up a virtual network environment for testing Layer 2 attacks.
- Host EVE-NG on this VirtualBox.
5. Kali Linux
a) Purpose: A penetration testing and ethical hacking Linux distribution with pre-installed tools.
b) Usage:
- Use tools like Yersinia and Ettercap to simulate DHCP starvation and rogue attacks.
- Act as the attacker’s platform to analyze vulnerabilities and practice mitigation techniques.
To start with Kali Linux, visit the official website to download the latest version and test your network’s security.
Demonstration: Configuring the DHCP Server
Let’s walk through configuring a DHCP server to assign IP addresses to network devices.
We’ll focus on configuring the FastEthernet interface, setting up a DHCP pool, and verifying whether the server sends an IP address to both the victim and attacker machines.
Step 1: Configure the FastEthernet Interface
Let’s head over to the DHCP server and configure our interface fa0/0:
interface fastEthernet 0/0
  ip address 192.168.1.1 255.255.255.0
   no sh
   no cdp run
1. interface fastEthernet 0/0:
- This command enters configuration mode for the FastEthernet interface
0/0. FastEthernetrefers to a 100 Mbps Ethernet port, and0/0is the specific port identifier.
2. ip address 192.168.1.1 255.255.255.0:
- Assigns an IP address and subnet mask to the FastEthernet interface.
192.168.1.1: The IP address for this interface serves as the gateway address for devices in the connected subnet.255.255.255.0: The subnet mask defining the network (in this case,192.168.1.0/24). It specifies that the first 24 bits are the network portion, allowing for 254 usable IP addresses in this subnet.
3. no sh (short for no shutdown):
Enables the interface. By default, interfaces are administratively turned off; thus, this command enables the interface and allows data transmission.
4. no cdp run:
- Disables the Cisco Discovery Protocol (CDP) on the interface.
- CDP is a Cisco-proprietary Layer 2 protocol for discovering other Cisco devices on the network. Disabling it improves security by preventing the leakage of device data.
Step 2: Set Up a DHCP Pool
Let’s create a DHCP pool on our server to assign IP addresses to devices on the network
ip dhcp pool test-1
  network 192.168.1.0 /24
  dns-server 8.8.8.8
  default-router 192.168.1.1
1. ip dhcp pool test-1:
- Creates a DHCP pool named
test-1. - This pool is used to define the range of IP addresses and other network configurations that will be assigned to clients.
2. network 192.168.1.0 /24:
- Specifies the network range of the IP addresses that this DHCP pool will manage.
192.168.1.0/24.: Refers to the network192.168.1.0with a subnet mask of255.255.255.0.- Clients requesting an IP address from this pool will receive an address within this range (e.g.,
192.168.1.1to192.168.1.254).
3. dns-server 8.8.8.8:
- Assigns the DNS server’s IP address to clients in this pool.
8.8.8.8: This is a public DNS server provided by Google.
4. default-router 192.168.1.1:
- Specifies the default gateway (router) IP address for clients in this pool.
192.168.1.1: The gateway that clients will use to send traffic outside their local subnet.
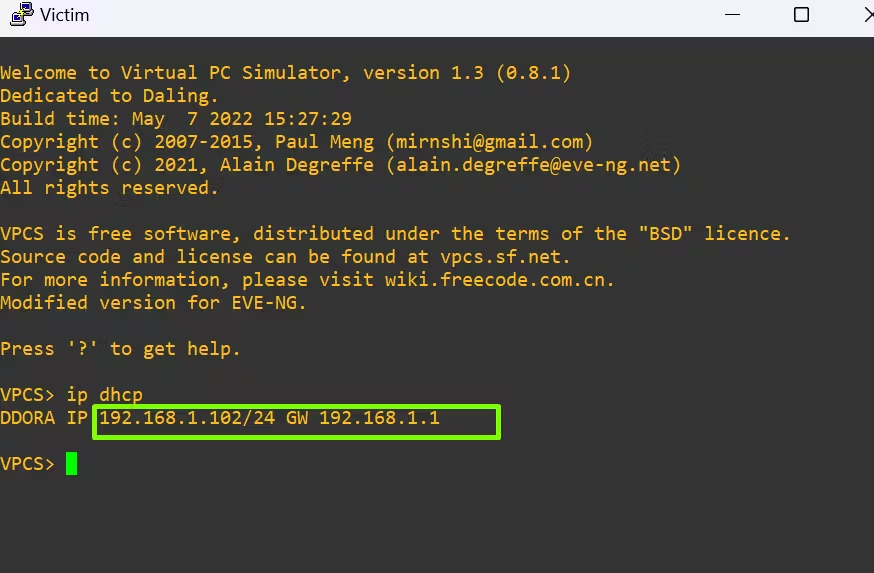
Step 3: Verify IP Assignment
Finally, let’s verify whether the victim and attacker machines have successfully received IP addresses from the DHCP server.

How DHCP Starvation Disrupts Networks
Using the Yersinia tool, we simulate a DHCP Starvation attack aimed at exhausting the IP address pool of the legitimate DHCP server.

Here is what happens:
- The attacker floods the DHCP server with multiple DHCP discovery requests, each appearing to originate from a unique MAC address.
- The DHCP server allocates all its available IP addresses to these fake requests.
- Attackers have grabbed all IP addresses using Starvation, and no more IP addresses remain; as a result, customers can no longer use them.
Rogue DHCP Attacks: Manipulating Network Configurations
- Ettercap’s capabilities for network manipulation and man-in-the-middle (MITM) attacks include the ability to launch a rogue DHCP attack.
- After the attack, the client’s IP address has changed.

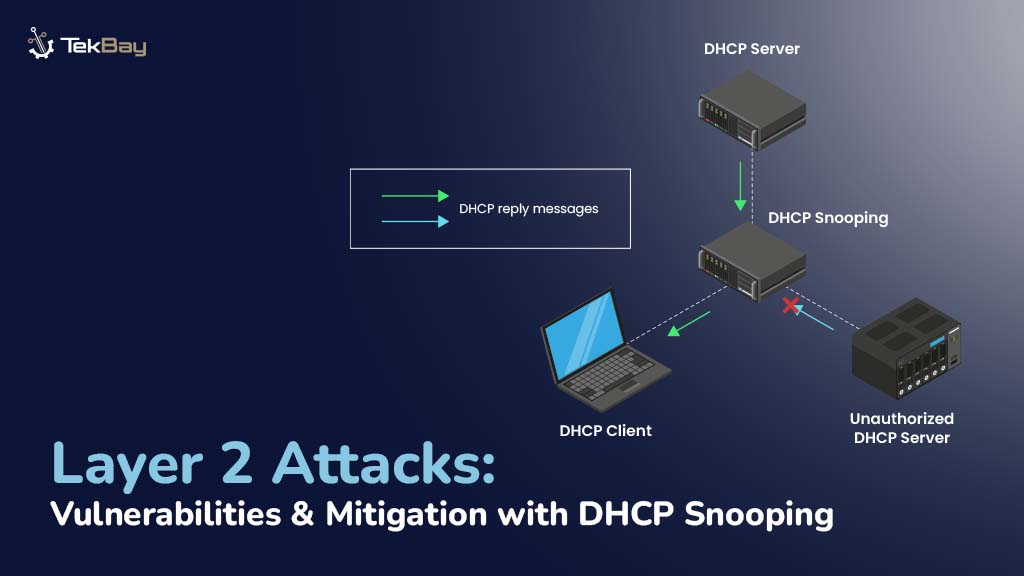
How to Mitigate Layer 2 Attacks?
Network administrators must implement strong security measures to safeguard their systems and tackle the risks posed by DHCP starvation and rogue DHCP attacks.
One highly effective tool for this is DHCP Snooping—a Layer 2 security feature that acts as a shield between trusted devices and potentially harmful ones on the network.
Unlike standard DHCP processes, which allow any device to request or assign IP settings, DHCP Snooping ensures only legitimate DHCP interactions are permitted.
As a result, it prevents attacks such as fake requests overwhelming DHCP servers or rogue servers assigning IP configurations.
You can read more about DHCP Snooping configuration in this guide here.
DHCP Snooping Configuration on Switch
SW(config)#ip dhcp snooping
SW(config)#ip dhcp snooping vlan 1
SW(config)#interface Ethernet 0/1
SW(config-if)#ip dhcp snooping trust
SW(config-if)# no ip dhcp snooping information option
SW(config)#interface Ethernet 0/1
SW(config-if)# ip dhcp snooping limit rate 100
SW(config)#interface range Ethernet 0/0, Ethernet 0/2
SW(config-if)# ip dhcp snooping limit rate 20 (20 packets per second)
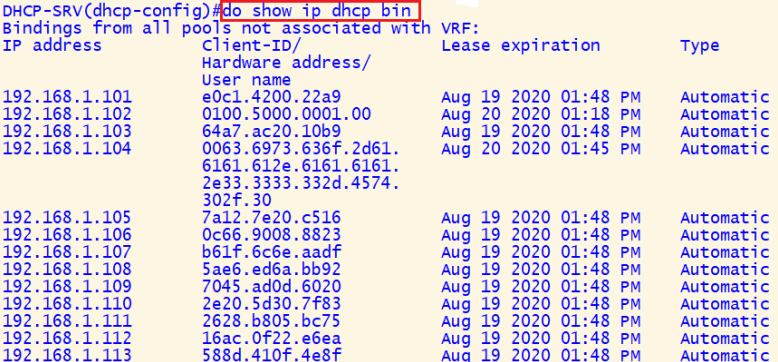
SW# show ip dhcp snooping binding
SW# show ip dhcp snooping
SW# show ip dhcp snooping statisticsExplaining the components:
1. SW(config)#ip dhcp snooping:
- Enables the DHCP snooping feature globally on the switch.
- DHCP snooping will now start monitoring DHCP traffic to enforce security policies.
2. SW(config)#ip dhcp snooping vlan 1:
- Enables DHCP snooping for VLAN 1.
- DHCP snooping is VLAN-specific, so it must be explicitly enabled for the VLANs where DHCP traffic should be monitored and secured.
3. SW(config)#interface Ethernet 0/1:
Enters the configuration mode for the Ethernet interface 0/1.
4. SW(config-if)#ip dhcp snooping trust:
- Marks the interface
Ethernet 0/1as trusted. - Trusted interfaces are allowed to send DHCP server-related messages (e.g., DHCP Offer and Acknowledgment). This is typically applied to ports where legitimate DHCP servers or uplinks are connected.
5. SW(config-if)#no ip dhcp snooping information option:
- Disables the inclusion of Option 82 (DHCP Relay Agent Information Option) in DHCP messages.
- Option 82 is used to include additional information (e.g., circuit ID and remote ID) when relaying DHCP packets, but it may not be necessary in certain configurations or could cause compatibility issues with older devices.
6. SW(config)#interface Ethernet 0/1:
- Re-enters the configuration mode for the Ethernet interface
0/1.
7. SW(config-if)#ip dhcp snooping limit rate 100:
- Configures a rate limit of 100 DHCP packets per second on the trusted interface Ethernet
0/1. - Rate limiting protects against DHCP starvation attacks by limiting the number of DHCP packets a device can send.
8. SW(config)#interface range Ethernet 0/0, Ethernet 0/2:
- Enters configuration mode for the interface range
Ethernet 0/0andEthernet 0/2.
9. SW(config-if)#ip dhcp snooping limit rate 20:
- Configures a rate limit of 20 DHCP packets per second on the untrusted interfaces
Ethernet 0/0andEthernet 0/2. - Lower limits are applied to untrusted interfaces to restrict the volume of DHCP messages from potentially malicious devices.
DHCP Snooping Output Overview
The output provides detailed information on the switch’s DHCP Snooping configuration, bindings, and operational status.
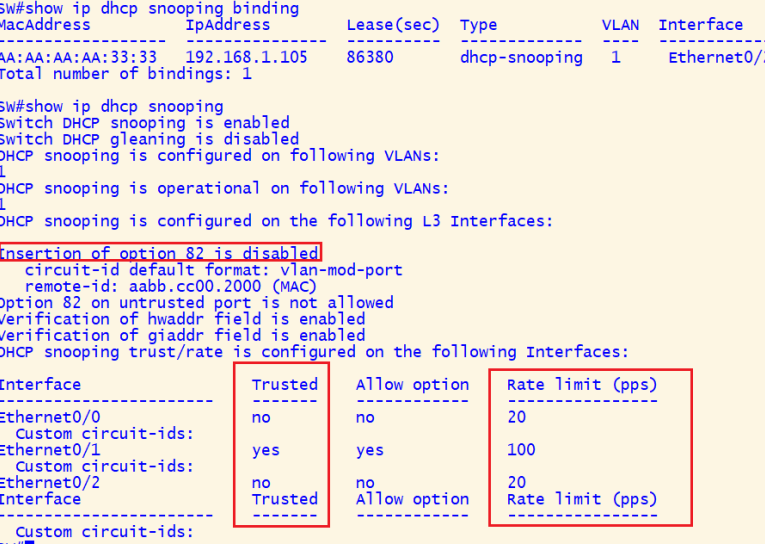
It serves the following purposes:
1. Verify DHCP Snooping Status:
- Confirm that DHCP Snooping is enabled and operational for VLAN 1.
2. Binding Database Validation:
- Displays the IP-to-MAC bindings for devices obtained through DHCP, ensuring IP address assignment integrity.
3. Security Configuration Insight:
- Shows whether Option 82 insertion is enabled or disabled, which impacts DHCP relay behavior.
- Ensures that untrusted interfaces cannot process unauthorized DHCP traffic.
4. Interface Configuration Overview:
- Lists the trust status (
TrustedorUntrusted) of each interface. - Displays rate limits for DHCP traffic on both trusted and untrusted interfaces to prevent DHCP starvation attacks.
Conclusion
Compromised DHCP-based vulnerabilities, such as DHCP starvation and rogue DHCP attacks, can disrupt network connections, cause sensitive data breaches, and even cause disaster.
DHCP starvation attacks can fill up all the available IP addresses on the server, stopping real devices from connecting to the network. On the other hand, rogue DHCP attacks involve fake servers that can redirect traffic, allow hackers to spy on your data, or mess up the network settings.
To mitigate these attacks, DHCP Snooping is a critical security feature. By enabling DHCP snooping on specific VLANs, setting rate limits on traffic, and marking certain interfaces as trusted, you can prevent unauthorized devices from interfering with your DHCP traffic and compromising network security.
The binding database helps track which devices use which IP addresses, making it easier to spot unusual activity.


