
Managing data persistence in Kubernetes environments can be a significant challenge, especially when containers restart or crash, potentially risking critical data loss. So, what if there were a reliable storage solution that retains data even after instances of container failures?
That’s where the Network File System (NFS) comes to the rescue. But for Kubernetes, dynamic NFS provisioning takes it a step further- it ensures data availability and automates storage provisioning so that data is consistently available across your containerized applications.
In this guide, we’ll learn how to set up dynamic NFS provisioning in Kubernetes to help you maintain data integrity and simplify storage management.
Importance Of Persistent Storage in Kubernetes
Since Kubernetes is optimized for stateless workloads, persistent storage is essential for managing stateful applications such as databases, caching systems, and file storage.
These applications require persistent data storage to retain their state across multiple instances, updates, failures, or restarts. This ensures that data is not lost when pods are rescheduled or terminated.
Persistent storage ensures durability and availability in dynamic Kubernetes environments by decoupling data from container lifecycles. It also simplifies backup and recovery, ensuring business continuity while maintaining data consistency across development, staging, and production.
What is Dynamic NFS Provisioning in Kubernetes?
Dynamic NFS storage provisioning in Kubernetes allows you to automatically provision and manage NFS (Network File System) volumes on demand for your Kubernetes applications.
It enables the creation of PersistentVolumes (PVs) and PersistentVolumeClaims (PVCs) without requiring manual intervention or pre-provisioned storage.
When using dynamic provisioning, the NFS provisioner is responsible for:
- Creating PVs automatically based on PVC requests.
- Binding the PVs to the appropriate PVCs.
- Interfacing with the NFS server to manage storage directories.
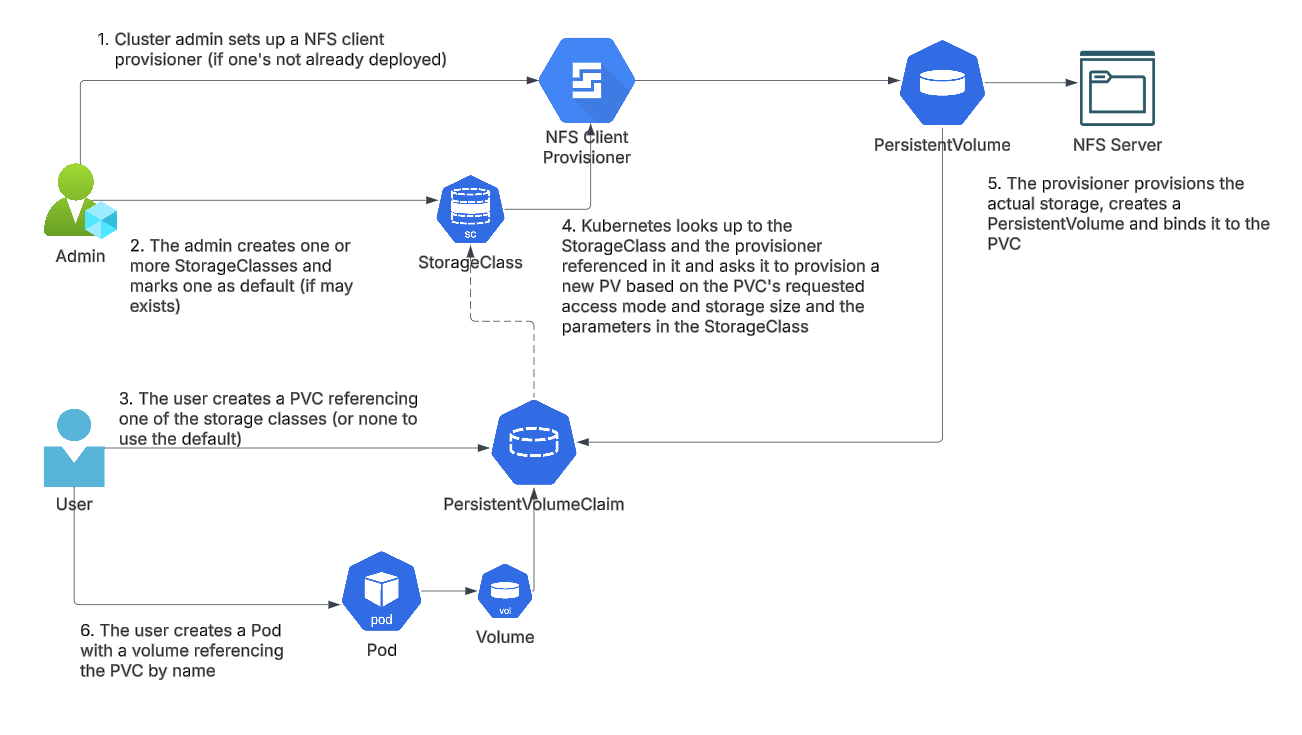
This automated approach reduces the complexity of managing persistent storage, especially in large-scale, distributed environments.
Pro Tip: When configuring NFS storage for Kubernetes, use Kubernetes probes to ensure your pods are always healthy.
Pre-requisites
- Pre-installed Kubernetes cluster
- Internet Connectivity
- Standalone NFS server
- User with admin access to the Kubernetes cluster
Step-by-Step Guide To Dynamic NFS Provisioning For Persistence Storage
Step 1: Setting up the NFS server
Before Kubernetes can provision storage dynamically, an NFS server must be configured as the storage backend. This server will host the storage directory where Kubernetes creates and manages persistent volumes.
1.1. Installing and Starting the NFS server
- Run the following command to install the
nfs-utilspackage, which contains the utilities required to configure and run NFS:
sudo yum install -y nfs-utils- Once installed, start the NFS service and ensure it runs at boot:
sudo systemctl enable nfs-server
sudo systemctl start nfs-server- Finally, confirm that the NFS server is running by checking the status:
sudo systemctl status nfs-serverIf it’s running, you’ll see an active status, as shown in the figure below:

1.2. Create a Shared Directory for NFS
Next, create the directory that serves as a shared storage location for Kubernetes (which will be shared over NFS). Ensure the directory has the correct ownership and permission to access, read, and write.
sudo mkdir -p /mnt/nfs_share
sudo chown -R nobody:nobody /mnt/nfs_share
sudo chmod 777 /mnt/nfs_share
Here’s a breakdown of the commands:
sudo mkdir -p /mnt/nfs_share: Creates the/mnt/nfs_sharedirectory, ensuring parent directories are created if needed.sudo chown -R nobody:nobody /mnt/nfs_share: Changes the directory ownership to thenobodyuser and group, allowing NFS access.sudo chmod 777 /mnt/nfs_share: Sets read, write, and execute permissions for all users (adjust for production use).
1.3. Configure the NFS Export Rules
Open the /etc/exports file and add the following line to allow a specific network or IP range to access the shared directory.
sudo nano /etc/exports
/mnt/nfs_share 10.0.149.229/24(rw,sync,no_root_squash,no_subtree_check)
Command Overview:
10.0.149.229/24: Replace with your client network or specific IP.rw: Read and write access.sync: Ensures changes are committed before the response.no_root_squash: Allows root access (use cautiously).
1.4. Apply NFS configuration
Run the command to apply changes and restart the server:
sudo exportfs -arv
sudo systemctl restart nfs-server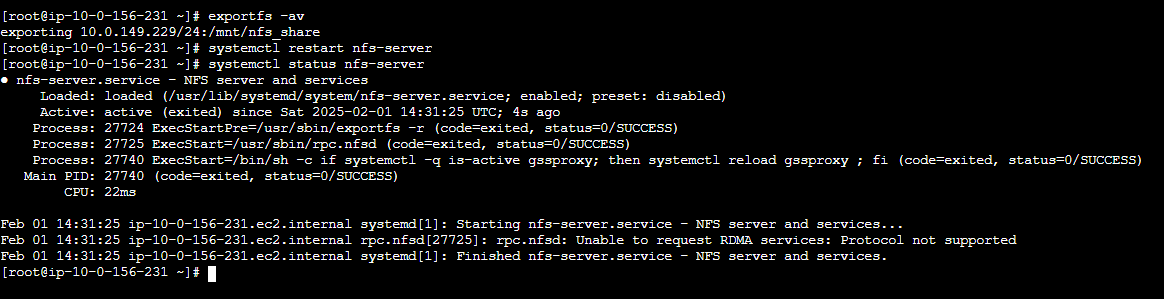
1.5. Verify NFS Export
Check whether the NFS directory is successfully shared:
showmount -e
Step 2: Install NFS Client Package on K8s Nodes
Each Kubernetes node using the NFS storage must have NFS client utilities installed.
Install the client package on all Kubernetes worker nodes:
sudo yum install -y nfs-utilsStep 3: Install and Configure NFS Client Provisioner
We will deploy the NFS Client Provisioner to automate the creation and management of NFS-backed Persistent Volumes (PVs) in your Kubernetes cluster. This provisioner enables dynamic provisioning of PVs using the NFS server you’ve set up.
3.1. Create Storage Class for Dynamic PV Provisioning
Storage Class defines the provisioning behavior for dynamically created PVs. We will create a storage class called nfs-storage that the NFS client provisioner will use.
apiVersion: storage.k8s.io/v1
kind: StorageClass
metadata:
  name: nfs-storage
provisioner: nfs-storage
parameters:
  archiveOnDelete: "false"
Learn more about StorageClass configurations with Kubernetes StorageClass documentation.
3.2. NFS Client Provisioner Deployment
Next, we deploy the NFS client provisioner that will interact with the NFS server to provision PVs automatically. Use the following YAML configuration:
apiVersion: apps/v1
kind: Deployment
metadata:
  name: nfs-client-provisioner
  namespace: default
spec:
  replicas: 1
  selector:
    matchLabels:
      app: nfs-client-provisioner
  strategy:
    type: Recreate
  template:
    metadata:
      labels:
        app: nfs-client-provisioner
    spec:
      containers:
      - env:
        - name: PROVISIONER_NAME
          value: nfs-storage     #StorageClass Provisoner Name
        - name: NFS_SERVER
          value: 10.0.156.231    #NFS server IP
        - name: NFS_PATH
          value: /mnt/nfs_share  #NFS Mount directory
        image: gcr.io/k8s-staging-sig-storage/nfs-subdir-external-provisioner:v4.0.0
        name: nfs-client-provisioner
        resources:
          limits:
            cpu: "1"
            memory: 850Mi
          requests:
            cpu: 10m
            memory: 10Mi
        volumeMounts:
        - mountPath: /persistentvolumes
          name: nfs-client-root
      serviceAccountName: nfs-client-provisioner
      volumes:
      - name: nfs-client-root
        nfs:
          path: /mnt/nfs_share
          server: 10.0.156.231
3.3. Create a Service Account with Required Permissions
The NFS client provisioner needs a service account with permission to interact with Kubernetes resources. We will create the necessary permissions using ClusterRole and ClusterRoleBinding.
To ensure the provisioner works correctly and avoids conflicts, we configure leader election using the Role and RoleBinding resources.
apiVersion: v1
kind: ServiceAccount
metadata:
  name: nfs-client-provisioner
  # replace with namespace where provisioner is deployed
  namespace: default
---
kind: ClusterRole
apiVersion: rbac.authorization.k8s.io/v1
metadata:
  name: nfs-client-provisioner-runner
  namespace: default
rules:
  - apiGroups: [""]
    resources: ["nodes"]
    verbs: ["get", "list", "watch"]
  - apiGroups: [""]
    resources: ["persistentvolumes"]
    verbs: ["get", "list", "watch", "create", "delete"]
  - apiGroups: [""]
    resources: ["persistentvolumeclaims"]
    verbs: ["get", "list", "watch", "update"]
  - apiGroups: ["storage.k8s.io"]
    resources: ["storageclasses"]
    verbs: ["get", "list", "watch"]
  - apiGroups: [""]
    resources: ["events"]
    verbs: ["create", "update", "patch"]
---
kind: ClusterRoleBinding
apiVersion: rbac.authorization.k8s.io/v1
metadata:
  name: run-nfs-client-provisioner
subjects:
  - kind: ServiceAccount
    name: nfs-client-provisioner
    # replace with namespace where provisioner is deployed
    namespace: default
roleRef:
  kind: ClusterRole
  name: nfs-client-provisioner-runner
  apiGroup: rbac.authorization.k8s.io
---
kind: Role
apiVersion: rbac.authorization.k8s.io/v1
metadata:
  name: leader-locking-nfs-client-provisioner
  # replace with namespace where provisioner is deployed
  namespace: default
rules:
  - apiGroups: [""]
    resources: ["endpoints"]
    verbs: ["get", "list", "watch", "create", "update", "patch"]
---
kind: RoleBinding
apiVersion: rbac.authorization.k8s.io/v1
metadata:
  name: leader-locking-nfs-client-provisioner
  # replace with namespace where provisioner is deployed
  namespace: default
subjects:
  - kind: ServiceAccount
    name: nfs-client-provisioner
    # replace with namespace where provisioner is deployed
    namespace: default
roleRef:
  kind: Role
  name: leader-locking-nfs-client-provisioner
  apiGroup: rbac.authorization.k8s.io
3.4. Apply the YAML Files
After creating the above YAML files, apply them to your Kubernetes cluster to deploy the NFS client provisioner and necessary resources:
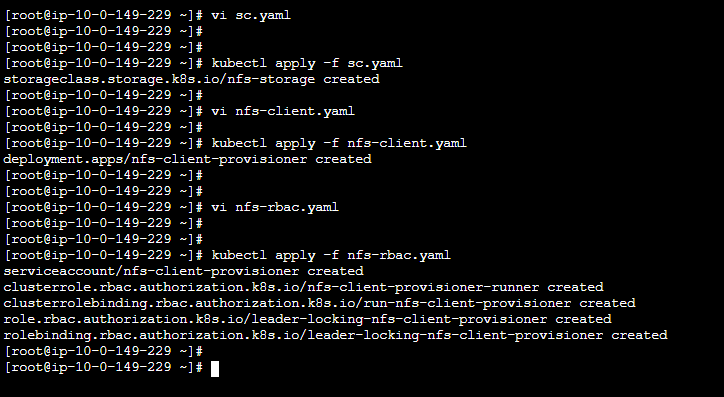
Now, check if all the objects are running.

Step 4: Dynamic PVC Volume Creation and Testing
In this step, we’ll verify the dynamic creation of a Persistent Volume Claim (PVC), its binding to a Persistent Volume (PV), and test data persistence with NFS-backed storage in Kubernetes.
4.1. Create the PersistentVolumeClaim (PVC) And Apply
To test dynamic PVC volume creation, create the nfs-pvc.yaml file with the following configuration:
apiVersion: v1
kind: PersistentVolumeClaim
metadata:
name: nfs-pvc
spec:
accessModes:
- ReadWriteOnce
storageClassName: nfs-storage
resources:
requests:
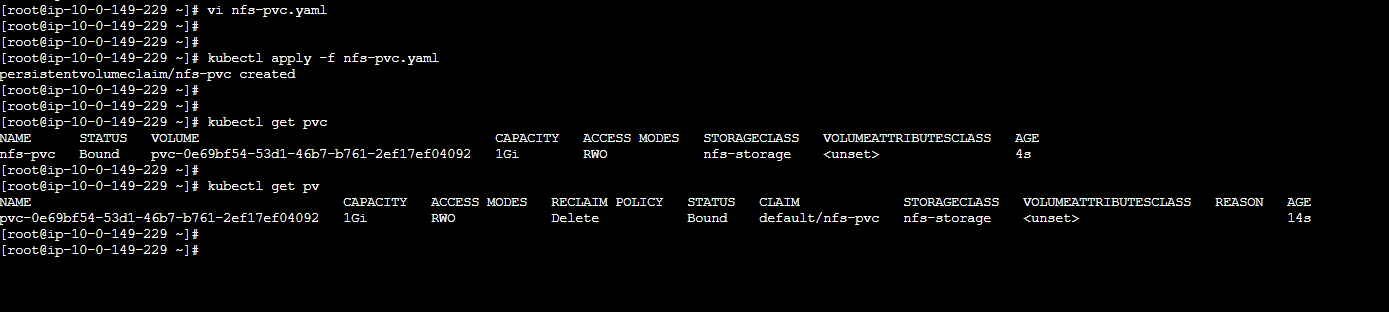
storage: 1GiApply the nfs-pvc.yaml file in your Kubernetes cluster to create the PersistentVolumeClaim.
kubectl apply -f nfs-pvc.yaml
4.2 Verifying PVC and PV Creation
After applying the PVC, Kubernetes dynamically provisions a corresponding PV. We verify this by checking the PVC and PV status:
kubectl get pvc
kubectl get pv
Step 5: Deploying an Nginx Pod with the Mounted PVC
Now that we have the PVC set up and dynamically provisioned, we’ll create a deployment for Nginx to test if the volume can be mounted and used correctly inside a pod.
apiVersion: apps/v1
kind: Deployment
metadata:
  labels:
    app: nginx
  name: nfs-nginx
spec:
  replicas: 1
  selector:
    matchLabels:
      app: nginx
  template:
    metadata:
      labels:
        app: nginx
    spec:
      volumes:
        - name: nfs-nginx
          persistentVolumeClaim:
            claimName: nfs-pvc       #PVC name we created above.
      containers:
        - image: nginx
          name: nginx
          volumeMounts:
            - name: nfs-nginx
              mountPath: /usr/share/nginx/html    #Mount path for pod
Apply the deployment file and verify that the pod is running:
kubectl apply -f deployment.yaml
kubectl get pods

Step 6: Verify Data Persistence
Now, check if the mounted volume inside the Nginx pod is accessible and writable.
1. Access the pod shell:
kubectl exec -it -- /bin/bash
2. Navigate to the mounted directory and check for existing files:
cd /usr/share/nginx/html/
ls

The above image confirms that the directory is initially empty.
Step 7: Create a Test File and Verify Persistence
To test persistence, create a simple index.html file under /usr/share/nginx/html.
echo "Hello World" > /usr/share/nginx/html/index.html
cat /usr/share/nginx/html/index.html

If everything is working correctly, the index.html file created inside the Nginx pod should be synchronized with the PV on the NFS server.
Let’s check by doing the following:
- SSH into the NFS server.
- Navigate to the directory where the PVC is mounted.
- List the files and verify if
index.htmlexists.
ls /nfs_share/default-nfs-pvc-/
cat /nfs_share/default-nfs-pvc-/index.html
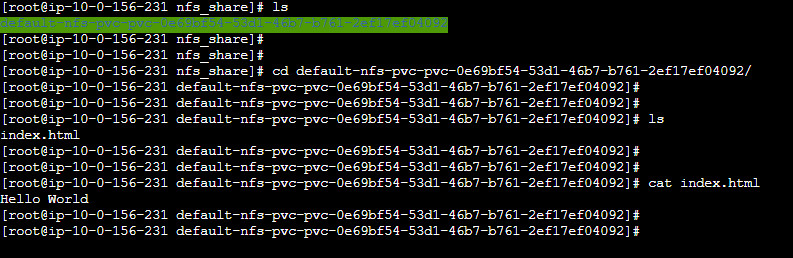
During our testing, we observed that we could access the file (index.html), we created from within the pod, from the NFS server mount path, confirming that the NFS server share is also accessible within the pod.
Conclusion
Dynamic NFS provisioning simplifies storage management in Kubernetes by automating the creation of Persistent Volumes (PVs) and Persistent Volume Claims (PVCs).
This approach reduces manual intervention and ensures data remains available and consistent, even during pod failures or restarts.
With NFS-backed storage, Kubernetes environments can achieve reliable data persistence and enhanced performance. Adopting this approach minimizes operational overhead, ensures data integrity, and simplifies storage management for containerized applications.
Are you looking to scale your Kubernetes environment with optimized persistent storage management? With TekBay’s expert cloud services, you can seamlessly integrate dynamic NFS storage solutions with AWS EKS for reliable, scalable, and consistent storage solutions.


