Managing application traffic is crucial for delivering smooth, seamless experiences in today’s fast-paced digital world. Host-based routing is one efficient way to handle this, especially in multi-domain environments.
This technique lets you direct traffic to domains using a single load balancer, sending requests to the correct EC2 instances or containers based on the host header.
Tools like Application Load Balancers (ALB) simplify this process, helping you optimize scalability and user experience.
What Is Host-Based Routing?
Host-based routing is a traffic management strategy in which incoming requests to a server are directed based on the host header in the HTTP request, which specifies the domain name.
Using a single load balancer or server, you can host multiple domains or subdomains, making management simpler while maximizing resource utilization.
Why Use Host-Based Routing?
- Efficient Traffic Management: Routes requests to specific services or servers based on the hostname.
- Simplified Multi-Domain Management: Manage multiple domains or subdomains through a single ALB.
- Cost Efficiency: Reduce hardware and operational expenses.
- Scalability and Flexibility: Supports dynamic scaling for individual applications without affecting others.
- Enhanced Security: Easily integrates SSL/TLS certificates for secure communication.
- Optimized User Experience: Minimize latency by directing traffic to the most suitable backend resource.
When to Use Host-Based Routing?
Host-based routing is the best option when you need to serve several domains or subdomains from a single server or IP address. It routes incoming requests to various apps according to the hostname given in the URL.
This method works particularly well for managing microservices architectures, where each service is reachable by its own hostname. It also optimizes resource use and combines services.
Example Scenario:
Consider a scenario where a company intends to run multiple web applications on a single server to reduce expenses, including a main website, a blog, and an e-commerce store.
- www.company.com directs traffic to the main website.
- blog.company.com routes to the blog server.
- shop.company.com connects to the e-commerce platform.
Using host-based routing, the server can route incoming requests to the appropriate application based on the hostname in the URL.
Best Practices
To effectively implement host-based routing, consider the following best practices:
- Use a Reliable Reverse Proxy: A robust reverse proxy server, such as Nginx or HAProxy can efficiently route incoming requests based on hostnames.
- Secure Domains with SSL/TLS Certificates: Implement HTTPS by obtaining SSL/TLS certificates for each hostname to encrypt data and enhance security.
- Accurately Configure DNS Settings: Ensure all domain names and subdomains correctly point to your server’s IP address through the appropriate DNS records.
Steps to Setup Host-Based Routing
To set host-based routing, you will have to create a load balancer, a server where you will host the applications, and configure Nginx to handle host headers.
Step 1: Create a load balancer (Application Load Balancer)
- Login to AWS Console and navigate to the EC2 Dashboard.
- Under the “Load Balancing” section, click on Load Balancers and click on Create Load Balancer.
- Name your ALB, choose a scheme, and select the VPC and Availability Zones.
- Configure Listeners: Set up an HTTP listener on port 80, but if you are serving HTTPS, configure SSL certificates under the HTTPS listener (port 443).
- Configure your security group: You may choose an existing security group or create a new one (if you don’t have one).
- After reviewing your configurations, click on Create.
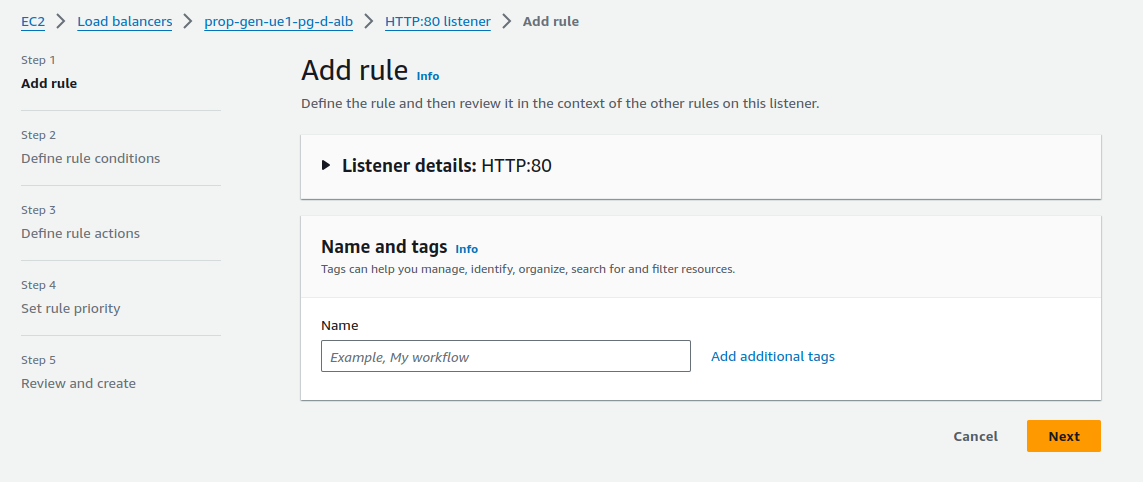
Step 2: Configure Host-Based Routing Rules
To route traffic to different target groups based on the host header, you will need to do the following:
- In the “Load Balancers” configuration, go to the “Listener” and select the listener (port 80 or 443) that you want to configure.
- In the “Add Rule,” click on View/edit rules for manual configuration- to forward traffic based on the Host header.
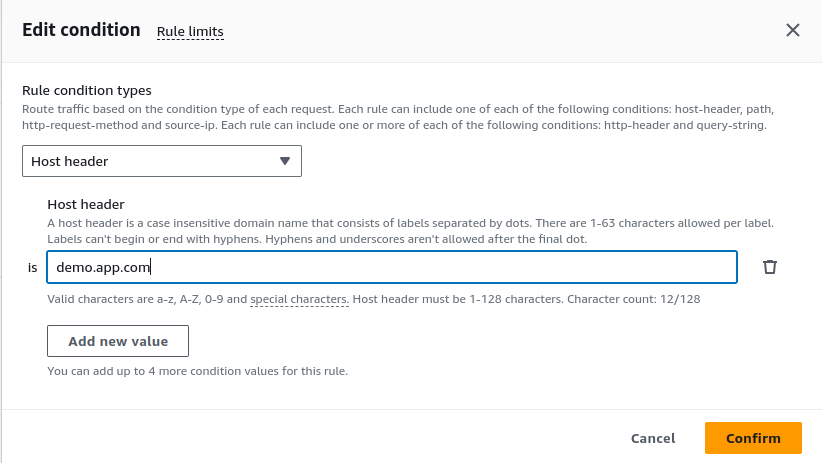
- Create Conditions for Routing:
In the “Define rules conditions” section, select “Host header” and enter the domain names you want the ALB to route. We have used demo.app.com in our demo.
If you want traffic from two sources, like www.worktesting.com and blog.worktesting.com, to go to different groups, you can add them as conditions.
Step 3: Configure Target Group
Defining target groups for each domain or application helps the ALB to understand where to send the traffic. You need to do the following:
- Go to ‘Target Groups’ in the EC2 Dashboard.
- Create a target group and choose the type of target, e.g., instances or IP addresses for your EC2 instances (we selected ‘Instances’ for this demo).
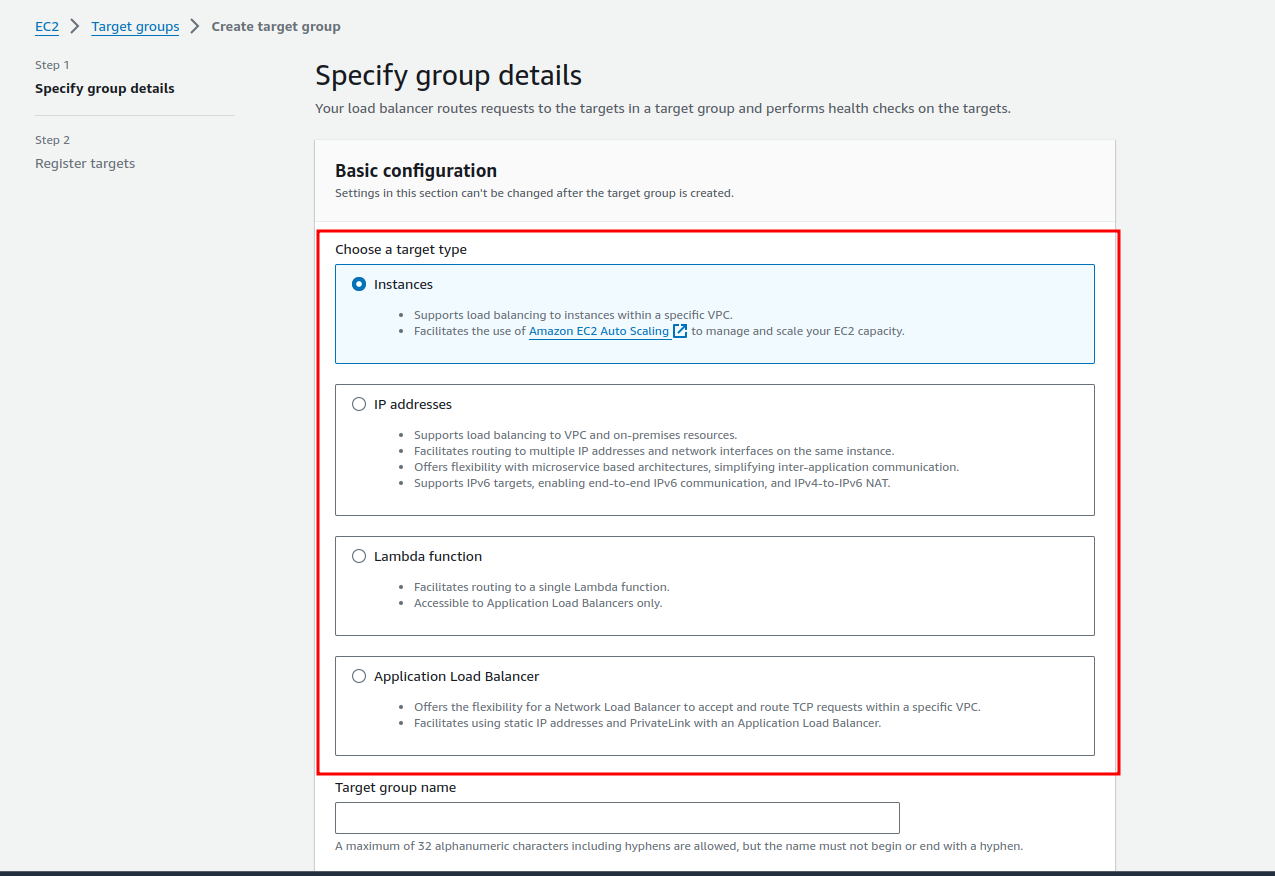
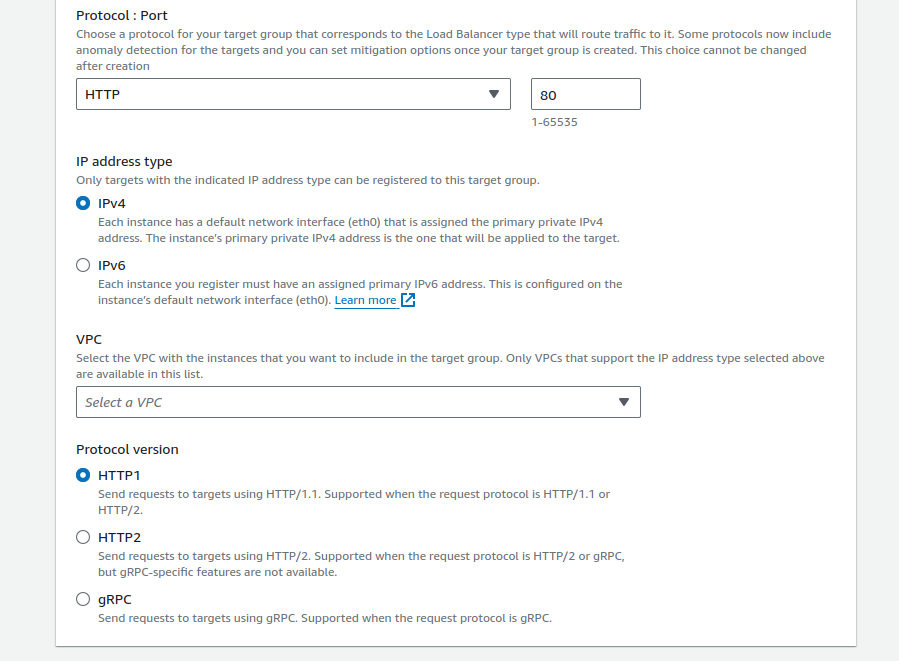
- Set the Protocol and Port depending on your application (we used HTTP and 80 as our protocol and port, respectively).
- After choosing EC2 instances (that will receive traffic for the domain), register EC2 instances with the target group.
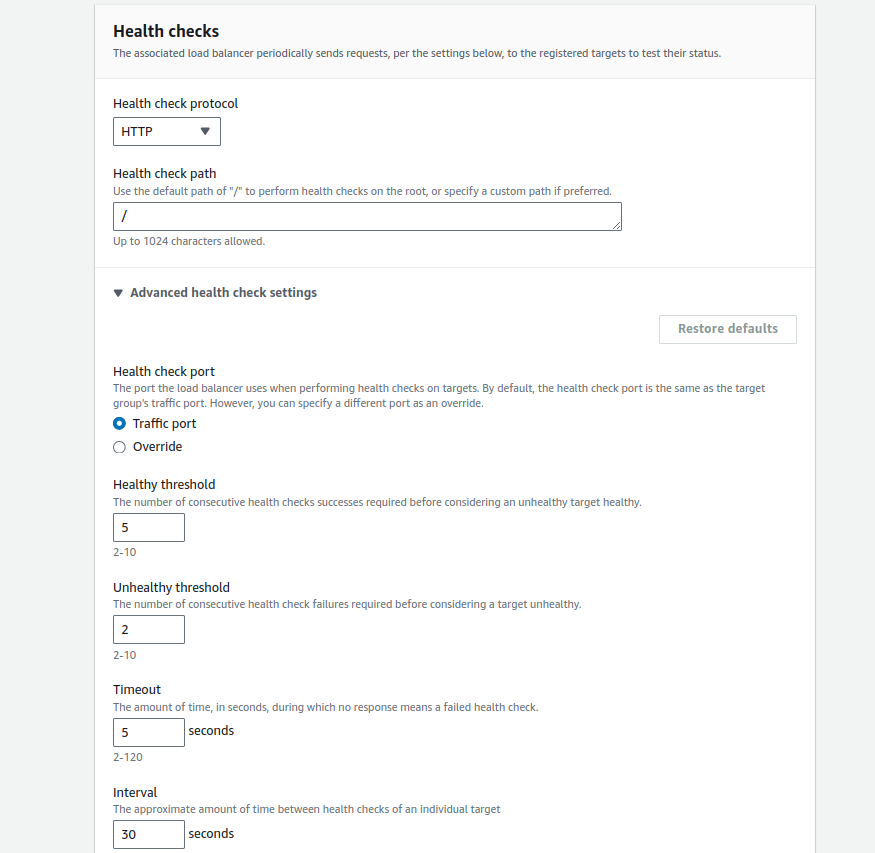
- Now, configure Health check settings for each target group to ensure that only healthy instances handle traffic.
- Set the Health Check protocol, port, and path as show below.
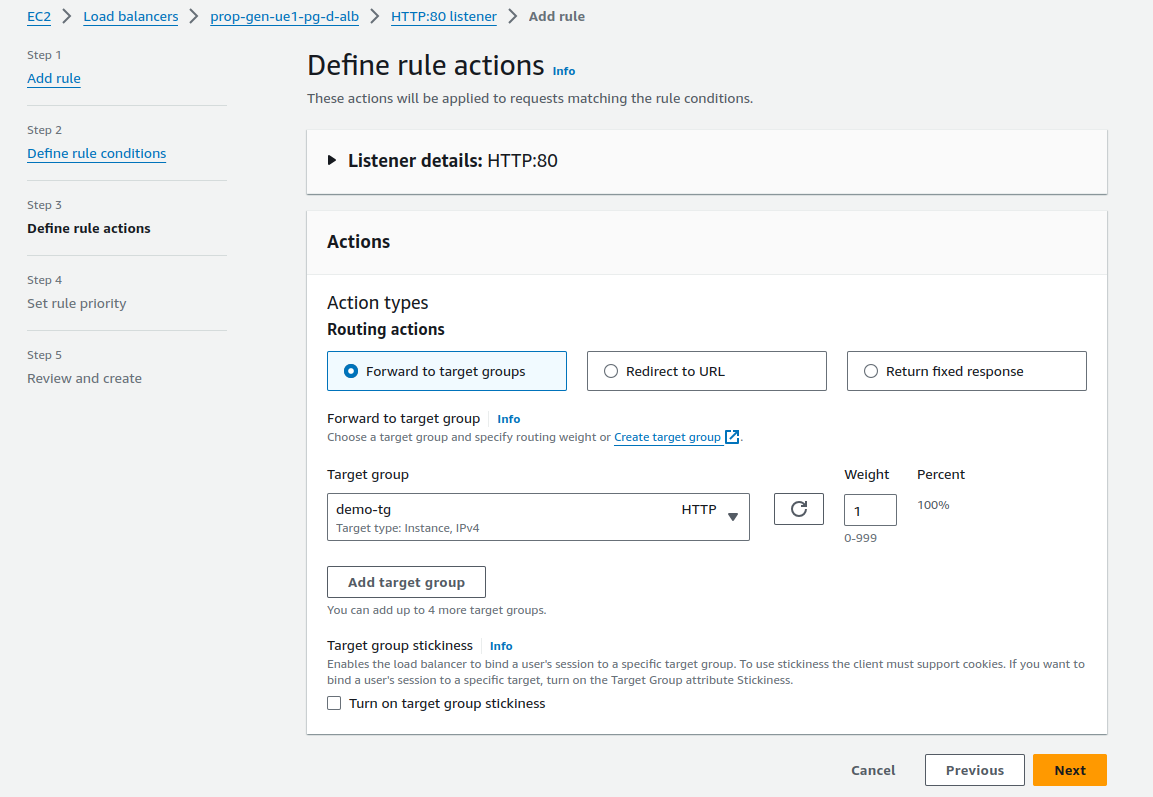
- Define Actions for Routing: Go to the EC2> Load Balancers > Listener as in Step 2.
You can select three types of routing actions (as you desire): (a) Forward to the target group, (b) Redirect to URL, and (c) Redirect to URL.
Finally, after setting up the load balancer, the following is the resource map for the ALB.

Step 4: Configure Nginx for Host-Based Routing
Once the resource map for the ALB application load balancer is configured, we will have to configure Nginx to handle host headers.
server {
    listen 80;
    server_name demo1.application.com;

    location / {
        proxy_pass http://localhost:3000;
        proxy_http_version 1.1;
        proxy_set_header Upgrade $http_upgrade;
        proxy_set_header Connection "upgrade";
        proxy_set_header Host $host;
        proxy_cache_bypass $http_upgrade;
    }
}

server {
    listen 80;
    server_name demo2.application.com;

    location / {
        proxy_pass http://localhost:3001;
        proxy_http_version 1.1;
        proxy_set_header Upgrade $http_upgrade;
        proxy_set_header Connection "upgrade";
        proxy_set_header Host $host;
        proxy_cache_bypass $http_upgrade;
    }
}
This configuration defines two virtual servers using NGINX, both listening on port 80 for HTTP traffic.
Each server is mapped to a different domain and proxies the traffic to a separate local application running on different ports:
1. First server block:
- Listens for requests on demo1.application.com
- Forwards (proxies) traffic to an application running on localhost:3000
- Sets necessary headers for WebSocket communication and HTTP version
2. Second server block:
- Listens for requests on demo1.application.com
- Forwards (proxies) traffic to an application running on localhost:3001
- Also includes headers for WebSocket and HTTP version handling
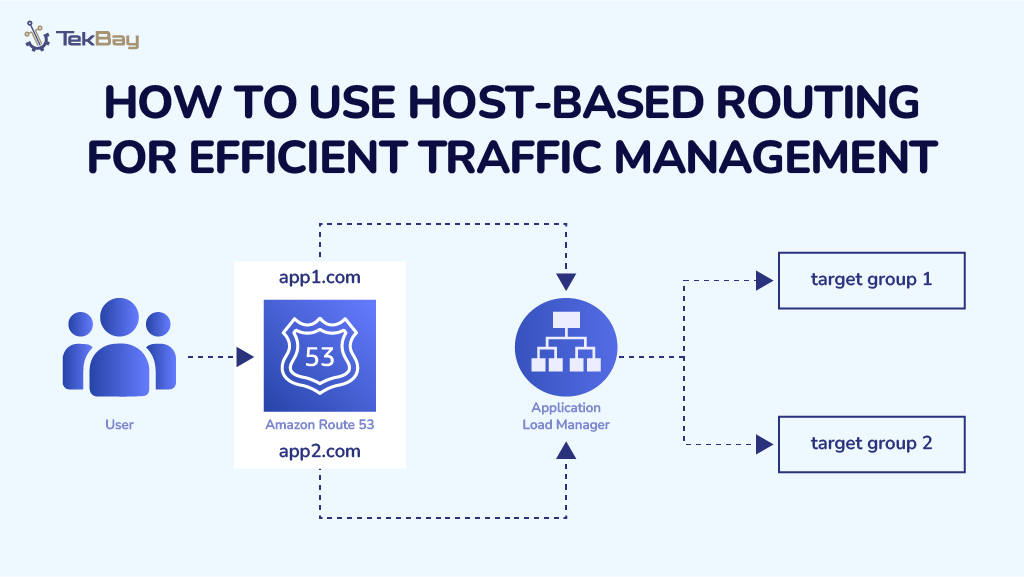
Traffic Flow Based on The Listener Rule
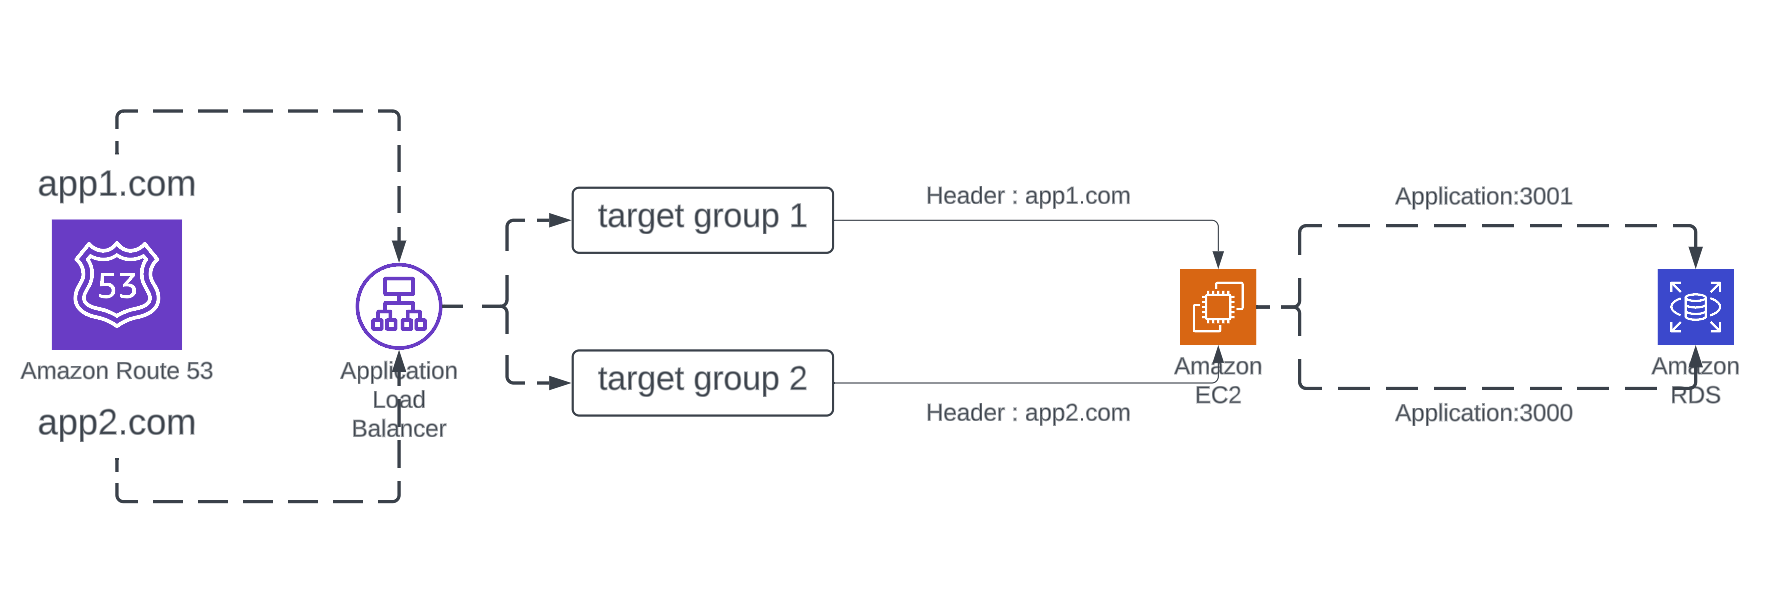
Imagine your server is handling traffic for two domains: app1.com and app2.com. With host-based routing, an Application Load Balancer (ALB) ensures users land on the correct application without a hitch.
When someone visits either domain, the ALB redirects them to the correct application on your server by using predefined target groups.
Conclusion
Host-based routing is a smart way to manage traffic across multiple applications hosted on the same infrastructure. Directing requests based on the domain name makes it easier to deliver your apps efficiently.
Not only does it simplify your setup, but it also boosts scalability and resource usage, helping your system run more smoothly.
Whether you’re managing a few apps or a complex multi-domain environment, host-based routing ensures a seamless user experience and a more streamlined, effective operation for you.


