Standard Optical Character Recognition (OCR) technologies often struggle to extract information from complex, semi-structured government documents, such as Nepali driving licenses. These documents feature unique layouts, mixed languages (Nepali and English), and custom fonts, which can cause generic OCR systems to produce inaccurate and unreliable results.
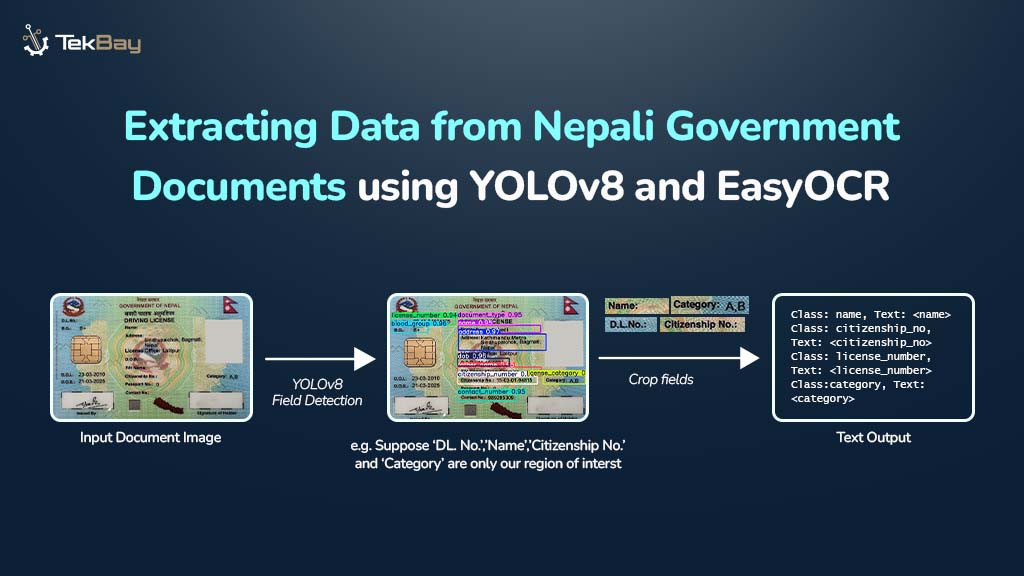
The blog introduces a two-step approach to tackle these challenges. First, the YOLOv8 model is used to precisely identify key fields of interest within the document. Next, EasyOCR performs selective text extraction from these identified fields, delivering clean, reliable, and highly accurate data.
By combining YOLOv8’s field detection capabilities with EasyOCR’s targeted text extraction, this method ensures efficient and precise information extraction from Nepali government documents, overcoming the limitations of traditional OCR approaches.
Prerequisites
To follow this tutorial, the following Python libraries need to be installed:
ultralytics: To train and infer on a YOLOv8 model.easyocr: To do Optical Character Recognition.opencv-python: In case of image processing (e.g., loading, storing, manipulating images).torch: The central PyTorch library that, with undefined arguments, is a prime dependency of easyocr.torchvision: A computer vision library in PyTorch, and another dependency of easyocr.torchaudio: PyTorch library of tools dealing with audio, occasionally installed together with torch and torchvision, but not actually used in the particular project at hand, dealing with OCR. However, it is needed.
Proposed Solution
Here’s how this solution effectively deals with the issue:
- Detect the Field (YOLOv8): A custom YOLOv8 model first identifies and precisely locates each field (like name or DOB) on the document by drawing bounding boxes. First, a finetuned YOLOv8 detects all the fields on the document (e.g., name, DOB, License no.), locating the coordinates of each class.
- Read from the Small Field (EasyOCR): Once found, EasyOCR only reads the text on the inside of these cropped boxes (bounding box is drawn on the found coordinates). This mode makes the extraction of text precise and reliable, as the general OCR tends to fall into the pitfalls of new complex layouts.
Project Structure
project_root/
├── data/                  # Contains all training images and labels
│   ├── train/             # Training dataset
│   └── val/               # Validation dataset
│   └── test/              # Testing dataset
├── model/                 # Folder where the trained model (best.pt) will be saved
├── outputs/               # Stores final results including annotated images and text files
│   ├── annotated_images/  # Annotated images with detected fields highlighted
│   └── ocr_results/       # Extracted text results saved as text files
├── test_images/           # Directory for new images to be processed
├── train.py               # Script used to train the model
├── run_ocr.py             # Script used to perform detection and OCR on new images
└── data.yaml              # Configuration file specifying dataset paths and class names for training
Step-by-Step Guide
Step 1: Teach the Model Where to Look
Before reading, the model must be trained to find the location of each field. This is done by showing it hundreds of labeled examples. Since real government IDs are private and confidential, for learning purposes, instead of asking friends, families, and colleagues, it is better to create synthetic (fake) data that looks realistic.
First, the fake images are annotated by drawing boxes around each field.

Each box is saved in the YOLO format, which is just a text file describing the box’s class and coordinates.

Next, a data.yaml file is created to tell the training script where the images are and what the classes are called.

With the data prepared, the model can be trained using the script below.
File: train.py
from ultralytics import YOLO

# A pre-trained model is loaded to serve as the starting point
model = YOLO('yolov8m.pt')

# The model is trained on the provided data
# The best performing model weights will be automatically saved as best.pt in the 'runs' folder
model.train(data='data.yaml', epochs=80, project='runs/train')
After running, the best.pt file can be found inside the runs/train/exp/weights/ folder and should be moved to the model/ directory.

Step 2: Find the Fields and Read the Text
Now that there is a trained model, it can be used to find and read the information from a new image.
The script below performs the entire “Detect –> Crop –> OCR” pipeline.
File: run_ocr.py
import cv2
from ultralytics import YOLO
import easyocr
import os

# --- Configuration ---
IMAGE_PATH = 'path/to/the/image'                    # Image to process
MODEL_PATH = 'model/best.pt'                         # Trained model
OUTPUT_DIR = 'outputs'                               # Folder to save results

# --- Load Models ---
model = YOLO(MODEL_PATH)
reader = easyocr.Reader(['ne', 'en']) # For Nepali and English
image = cv2.imread(IMAGE_PATH)

# --- Create Output Directories ---
os.makedirs(os.path.join(OUTPUT_DIR, 'ocr_results'), exist_ok=True)
os.makedirs(os.path.join(OUTPUT_DIR, 'annotated_images'), exist_ok=True)

# --- Run Detection and OCR ---
results = model(image)
all_text_results = {}

# Process each detected box
for result in results:
    for box in result.boxes:
        # Get coordinates and class name
        x1, y1, x2, y2 = map(int, box.xyxy[0])
        class_id = int(box.cls[0])
        label = model.names[class_id]

        # Crop the detected area from the image
        cropped_image = image[y1:y2, x1:x2]

        # Run OCR on just the cropped part
        ocr_result = reader.readtext(cropped_image, detail=0, paragraph=True)

        # Store the cleaned-up text
        if ocr_result:
            all_text_results[label] = ' '.join(ocr_result)

        # Draw boxes on the image for visualization
        cv2.rectangle(image, (x1, y1), (x2, y2), (0, 255, 0), 2)
        cv2.putText(image, f"{label}", (x1, y1 - 10), cv2.FONT_HERSHEY_SIMPLEX, 0.9, (36, 255, 12), 2)

# --- Save Final Outputs ---
base_name = os.path.splitext(os.path.basename(IMAGE_PATH))[0]

# Save the annotated image
cv2.imwrite(os.path.join(OUTPUT_DIR, 'annotated_images', f'{base_name}_annotated.jpg'), image)

# Save the extracted text to a .txt file
with open(os.path.join(OUTPUT_DIR, 'ocr_results', f'{base_name}.txt'), 'w', encoding='utf-8') as f:
    for label, text in all_text_results.items():
        f.write(f"{label}: {text}\n")

print(f"Processing complete. Results saved in '{OUTPUT_DIR}'.")
Step 3: Check the Results
After running run_ocr.py, two files will be found in the outputs/ folder.
1. The Annotated Image: An image showing the exact fields that were found.

2. The Text File: A clean, structured text file with the extracted information.
Class: name, Text: Ramesh Thapa
Class: dob, Text: 2052/11/04
Class: license_number, Text: 123456
Bringing It All Together
The process can be summarized as follows:
- Model Training: The YOLOv8 model learns to detect the positions of predefined fields.
- Field Detection + OCR: The trained model locates these fields, crops them, and passes them to EasyOCR.
- Structured Output: The OCR results are stored in a clean, labeled format for easy use in downstream applications.
This separation of tasks, finding the location first, then reading the text, is what makes the system so robust.
Wrapping Up
Using a “find first, read second” method enables the creation of a document reader that is quick, accurate, and dependable. This approach helps extract information from difficult documents more easily, making data management and analysis more efficient while demonstrating how modern computer vision can be used effectively.


