Jupyter Notebooks are excellent for exploring data and building machine learning models. However, retraining these models on new data by manually re-running notebook cells can be slow and prone to errors. When it is time to retrain a model on new data, practitioners often face the challenge of re-running numerous cells in the correct sequence, hoping no steps are missed.
A SageMaker Pipeline offers a solution by automating the entire workflow. It transforms manual notebook steps into a repeatable and automated process. This guide provides a complete walkthrough for building a production-grade pipeline, including all the necessary code and clear explanations for each step.
Why Use SageMaker Pipelines?
Notebooks are ideal for experimentation but not for production workflows. Relying solely on notebooks for repeated tasks can lead to several challenges:
- Manual and Slow: Rerunning notebooks is error-prone and time-consuming. Cells can be executed out of order, or critical steps may be missed.
- Environment Discrepancies: Differences in Python libraries between local and cloud environments can cause deployment failures.
- Hidden Errors: Hard-coded values in features may lead to inaccurate model training if the data changes.
- Lack of Traceability: Without a formal pipeline, tracking which dataset produced which model is difficult.
A SageMaker Pipeline solves these issues by defining workflows as a sequence of connected, repeatable steps. Once the pipeline is built, SageMaker executes it consistently, ensuring reliability, traceability, and reproducibility.
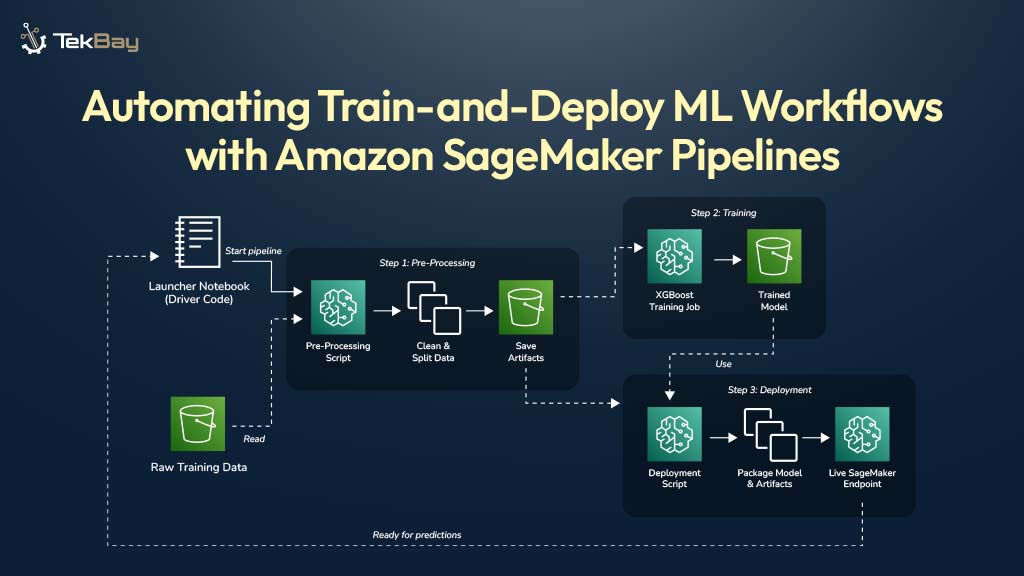
Our Goal: The Automated Train-and-Deploy Workflow
We will build a simple, three-step pipeline that takes raw data from AWS S3 and ends with a live prediction API.

- Preprocess: Reads raw data, cleans it, and prepares it for training.
- Train: Trains an XGBoost model on the clean data.
- Deploy: Creates a live, real-time API endpoint from the trained model.
Prerequisites
Before proceeding, ensure the following prerequisites are in place:
- An active AWS account.
- Basic knowledge of Python and some MLOps concepts.
- Familiarity with the AWS Management Console, Amazon S3, and Amazon SageMaker AI.
- A provisioned SageMaker Studio environment.
- An IAM (Identity and Access Management) role with
AmazonSageMakerFullAccesspermissions to allow the pipeline to create and manage resources.
Steps To Prepare Amazon SageMaker Pipeline
Step 1: Organize Your Project Files
A clean project structure is essential for maintainability. Inside the SageMaker Studio environment, a project folder should be created with the following layout. This organization keeps the code structured and easy to manage.
/
└── fraud-detection-pipeline/
    │
    ├── scripts/
    │   ├── preprocess.py      # Cleans the data
    │   ├── inference.py       # Code for the live API
    │   ├── deploy.py          # Script that creates the API
    │   ├── runner.sh          # Helper script for the deployment step
    │   └── requirements.txt   # Extra libraries for the deployment step
    │
    └── Launcher.ipynb         # Our "master" notebook to start the pipeline
The raw data for this example is a simple CSV file stored in an S3 bucket.

Step 2: Create the Building Blocks (The Scripts)
Next, the scripts for each step of the workflow are created.
1. The Preprocessing Script
This script reads raw data, performs feature engineering, and splits the data into training and validation sets. It also saves the tools it uses, such as the LabelEncoder and TfidfVectorizer. These saved “artifacts” are essential for ensuring that live data is processed in the same way as the training data.
File: scripts/preprocess.py
import pandas as pd
import argparse
import os
import joblib
from sklearn.model_selection import train_test_split
from sklearn.feature_extraction.text import TfidfVectorizer
from sklearn.preprocessing import LabelEncoder

if __name__ == "__main__":
    parser = argparse.ArgumentParser()
    parser.add_argument("--input-data-path", type=str, required=True)
    args = parser.parse_args()
    input_file = os.path.join(args.input_data_path, "generated_dataset_unified.csv")
    df = pd.read_csv(input_file)
    df['policy_purchase_date'] = pd.to_datetime(df['policy_purchase_date'])
    df['incident_date'] = pd.to_datetime(df['incident_date'])
    df['days_between_purchase_and_incident'] = (df['incident_date'] - df['policy_purchase_date']).dt.days
    df['incident_weekday'] = df['incident_date'].dt.weekday
    df['incident_month'] = df['incident_date'].dt.month
    df['claim_to_premium_ratio'] = df['claim_amount'] / df['premium_amount']
    avg_premium_per_type = df.groupby('policy_type')['premium_amount'].transform('mean')
    df['premium_vs_type_avg'] = df['premium_amount'] / avg_premium_per_type
    label_encoder = LabelEncoder()
    df['policy_type_encoded'] = label_encoder.fit_transform(df['policy_type'])
    df['text_combined'] = df['incident_location'] + " " + df['incident_description']
    vectorizer = TfidfVectorizer(max_features=100)
    text_embeddings = vectorizer.fit_transform(df['text_combined']).toarray()
    embedding_df = pd.DataFrame(text_embeddings, columns=[f'embed_{i}' for i in range(text_embeddings.shape[1])])
    df = pd.concat([df.reset_index(drop=True), embedding_df], axis=1)
    df_processed = df.drop(['policy_purchase_date', 'incident_date', 'incident_location', 'incident_description', 'policy_type', 'text_combined'], axis=1)
    is_fraud_col = df_processed.pop('is_fraud')
    df_processed.insert(0, 'is_fraud', is_fraud_col)
    train_columns = list(df_processed.columns[1:])
    train_df, validation_df = train_test_split(df_processed, test_size=0.2, random_state=42)
    processed_data_dir = "/opt/ml/processing"
    train_dir = os.path.join(processed_data_dir, "train")
    validation_dir = os.path.join(processed_data_dir, "validation")
    artifacts_dir = os.path.join(processed_data_dir, "artifacts")
    os.makedirs(train_dir, exist_ok=True)
    os.makedirs(validation_dir, exist_ok=True)
    os.makedirs(artifacts_dir, exist_ok=True)
    train_df.to_csv(os.path.join(train_dir, "train.csv"), index=False, header=False)
    validation_df.to_csv(os.path.join(validation_dir, "validation.csv"), index=False, header=False)
    joblib.dump(label_encoder, os.path.join(artifacts_dir, "label_encoder.joblib"))
    joblib.dump(vectorizer, os.path.join(artifacts_dir, "vectorizer.joblib"))
    joblib.dump(train_columns, os.path.join(artifacts_dir, "train_columns.joblib"))
    print("Preprocessing script complete.")
2. The Inference Script
This code will run inside the live API endpoint. A multi-container endpoint is deployed, where the first container (Scikit-learn) executes this script. It loads the saved artifacts and transforms incoming JSON data into a CSV string, which is the format expected by the second container (XGBoost).
File: scripts/inference.py
import pandas as pd
import joblib
import os
import json

def model_fn(model_dir):
    print("Loading preprocessing artifacts...")
    artifacts = {
        "label_encoder": joblib.load(os.path.join(model_dir, "label_encoder.joblib")),
        "vectorizer": joblib.load(os.path.join(model_dir, "vectorizer.joblib")),
        "train_columns": joblib.load(os.path.join(model_dir, "train_columns.joblib")),
    }
    print("Artifacts loaded successfully.")
    return artifacts

def input_fn(request_body, request_content_type):
    if request_content_type == "application/json":
        return json.loads(request_body)
    raise ValueError(f"Unsupported content type: {request_content_type}")

def predict_fn(input_data, artifacts):
    print("Running preprocessing...")
    df = pd.DataFrame([input_data])
    df['policy_purchase_date'] = pd.to_datetime(df['policy_purchase_date'])
    df['incident_date'] = pd.to_datetime(df['incident_date'])
    df['days_between_purchase_and_incident'] = (df['incident_date'] - df['policy_purchase_date']).dt.days
    df['incident_weekday'] = df['incident_date'].dt.weekday
    df['incident_month'] = df['incident_date'].dt.month

    avg_premium_per_type_value = 1500
    df['premium_vs_type_avg'] = df['premium_amount'] / avg_premium_per_type_value
    df['claim_to_premium_ratio'] = df['claim_amount'] / df['premium_amount']
    df['policy_type_encoded'] = artifacts["label_encoder"].transform(df['policy_type'])
    df['text_combined'] = df['incident_location'] + " " + df['incident_description']
    text_embeddings = artifacts["vectorizer"].transform(df['text_combined']).toarray()
    embedding_df = pd.DataFrame(text_embeddings, columns=[f'embed_{i}' for i in range(text_embeddings.shape[1])])

    df = pd.concat([df.reset_index(drop=True), embedding_df], axis=1)

    df_processed = df[artifacts["train_columns"]]

    print("Preprocessing complete. Returning CSV output.")
    return df_processed.to_csv(header=False, index=False)
3. The Deployment Script
This script drives the final pipeline step. It receives the S3 paths to the trained model and the preprocessor artifacts, and packages them into a PipelineModel, and then creates or updates the live endpoint.
File: scripts/deploy.py
import os
import tarfile
import argparse
import sagemaker
from sagemaker.model import Model
from sagemaker.pipeline import PipelineModel
import boto3

if __name__ == "__main__":
    parser = argparse.ArgumentParser()
    parser.add_argument("--endpoint-name", type=str, required=True)
    parser.add_argument("--role", type=str, required=True)
    parser.add_argument("--region", type=str, required=True)
    parser.add_argument("--model-data-s3-uri", type=str, required=True)
    args = parser.parse_args()

    boto_session = boto3.Session(region_name=args.region)
    sagemaker_session = sagemaker.Session(boto_session=boto_session)
    sm_client = boto_session.client("sagemaker")

    default_bucket = sagemaker_session.default_bucket()

    source_directory = "/opt/ml/processing/code"
    artifacts_path = "/opt/ml/processing/artifacts"

    output_dir = "/opt/ml/processing/output"
    os.makedirs(output_dir, exist_ok=True)
    artifacts_tar_path = os.path.join(output_dir, "artifacts.tar.gz")

    print("Packaging model artifacts (.joblib files)...")
    with tarfile.open(artifacts_tar_path, "w:gz") as tar:
        for filename in os.listdir(artifacts_path):
            if filename.endswith(".joblib"):
                tar.add(os.path.join(artifacts_path, filename), arcname=filename)

    artifacts_s3_uri = sagemaker_session.upload_data(
        path=artifacts_tar_path,
        bucket=default_bucket,
        key_prefix=f"{args.endpoint_name}/preprocessor-artifacts"
    )
    print(f"Uploaded preprocessor artifacts to: {artifacts_s3_uri}")

    preprocessor_model = Model(
        image_uri=sagemaker.image_uris.retrieve("sklearn", args.region, "1.2-1"),
        model_data=artifacts_s3_uri,
        role=args.role,
        entry_point="inference.py",
        source_dir=source_directory,
        sagemaker_session=sagemaker_session
    )

    xgboost_model = Model(
        image_uri=sagemaker.image_uris.retrieve("xgboost", args.region, "1.5-1"),
        model_data=args.model_data_s3_uri,
        role=args.role,
        sagemaker_session=sagemaker_session,
    )

    pipeline_model = PipelineModel(
        models=[preprocessor_model, xgboost_model],
        role=args.role,
        sagemaker_session=sagemaker_session
    )

    print(f"Deploying pipeline model to real-time endpoint '{args.endpoint_name}'...")

    try:
        sm_client.describe_endpoint(EndpointName=args.endpoint_name)
        update_existing_endpoint = True
        print(f"Endpoint '{args.endpoint_name}' exists. Will update.")
    except sm_client.exceptions.ClientError:
        update_existing_endpoint = False
        print(f"Endpoint '{args.endpoint_name}' does not exist. Will create.")

    pipeline_model.deploy(
        initial_instance_count=1,
        instance_type="ml.t2.medium",
        endpoint_name=args.endpoint_name,
        update_endpoint=update_existing_endpoint
    )

    print("Deployment request submitted successfully.")
4. The Helper Scripts
These small files manage the environment setup inside the deployment step. The requirements.txt file specifies dependencies, while runner.sh ensures they are installed before the Python deployment script runs.
File: scripts/requirements.txt
sagemaker>=2.194.0,<2.205.0
xgboost
numpy<2
File: scripts/runner.sh (This file must be made executable with chmod +x scripts/runner.sh)
#!/bin/bash
set -e
SCRIPT_DIR="/opt/ml/processing/code"
echo "Installing dependencies from ${SCRIPT_DIR}/requirements.txt..."
pip install -r "${SCRIPT_DIR}/requirements.txt"
echo "Running the deployment script: ${SCRIPT_DIR}/deploy.py..."
python "${SCRIPT_DIR}/deploy.py" "$@"
echo "Script finished successfully."
Step 3: The Command Center (The Launcher Notebook)
This is the only file that needs to be run manually. This notebook defines the pipeline’s structure, connects the inputs and outputs of each step, and instructs SageMaker to execute the entire workflow.

File: Launcher.ipynb
import sagemaker
from sagemaker.workflow.pipeline import Pipeline
from sagemaker.workflow.steps import ProcessingStep, TrainingStep
from sagemaker.processing import ScriptProcessor, ProcessingInput, ProcessingOutput
from sagemaker.sklearn.processing import SKLearnProcessor
from sagemaker.estimator import Estimator
from sagemaker.image_uris import retrieve
from sagemaker.inputs import TrainingInput

# --- 1. CONFIGURATION ---
role = sagemaker.get_execution_role()
sagemaker_session = sagemaker.Session()
region = sagemaker_session.boto_region_name

# --- Pipeline inputs and names ---
default_bucket = sagemaker_session.default_bucket()
input_data_bucket = "your-raw-data-bucket" # IMPORTANT: Change this to the name of your S3 bucket!
pipeline_name = "Fraud-Detection-EndToEnd-Pipeline"
endpoint_name = "fraud-detection-endpoint"
base_job_prefix = "fraud-detection"

# --- 2. DEFINE PROCESSORS ---

# Use the SKLearnProcessor for our preprocessing script
preprocess_processor = SKLearnProcessor(
    framework_version="1.2-1",
    instance_type="ml.t3.medium",
    instance_count=1,
    base_job_name=f"{base_job_prefix}/preprocess",
    role=role,
)

# Use a generic ScriptProcessor for our deployment step to run the shell script
deploy_processor = ScriptProcessor(
    image_uri=retrieve("sklearn", region, "1.2-1"),
    command=["/bin/bash"],
    instance_type="ml.t3.medium",
    instance_count=1,
    base_job_name=f"{base_job_prefix}/deploy",
    role=role,
)

# --- 3. DEFINE PIPELINE STEPS ---

# STEP 3.1: PREPROCESSING
step_preprocess = ProcessingStep(
    name="PreprocessData",
    processor=preprocess_processor,
    inputs=[ProcessingInput(source=f"s3://{input_data_bucket}/unified", destination="/opt/ml/processing/input")],
    outputs=[
        ProcessingOutput(output_name="train", source="/opt/ml/processing/train"),
        ProcessingOutput(output_name="validation", source="/opt/ml/processing/validation"),
        ProcessingOutput(output_name="artifacts", source="/opt/ml/processing/artifacts"),
    ],
    code="scripts/preprocess.py",
    job_arguments=["--input-data-path", "/opt/ml/processing/input"],
)

# STEP 3.2: TRAINING
step_train = TrainingStep(
    name="TrainModel",
    estimator=Estimator(
        image_uri=retrieve("xgboost", region, "1.5-1"),
        role=role,
        instance_count=1,
        instance_type="ml.m4.xlarge",
        output_path=f"s3://{default_bucket}/pipeline-output/training",
        base_job_name=f"{base_job_prefix}/train",
        hyperparameters={"objective": "binary:logistic", "eval_metric": "auc", "num_round": 100},
    ),
    inputs={"train": TrainingInput(
        s3_data=step_preprocess.properties.ProcessingOutputConfig.Outputs["train"].S3Output.S3Uri,
        content_type="text/csv"
    )}
)

# STEP 3.3: DEPLOYMENT
step_deploy = ProcessingStep(
    name="DeployEndpoint",
    processor=deploy_processor,
    code="scripts/runner.sh",
    inputs=[
        ProcessingInput(
            source=step_train.properties.ModelArtifacts.S3ModelArtifacts,
            destination="/opt/ml/processing/model"
        ),
        ProcessingInput(
            source=step_preprocess.properties.ProcessingOutputConfig.Outputs["artifacts"].S3Output.S3Uri,
            destination="/opt/ml/processing/artifacts"
        ),
        ProcessingInput(source="scripts", destination="/opt/ml/processing/code"),
    ],
    job_arguments=[
        "--endpoint-name", endpoint_name,
        "--role", role,
        "--region", region,
        "--model-data-s3-uri", step_train.properties.ModelArtifacts.S3ModelArtifacts,
    ]
)

# --- 4. ASSEMBLE AND RUN THE FULL PIPELINE ---
pipeline = Pipeline(
    name=pipeline_name,
    steps=[step_preprocess, step_train, step_deploy],
    sagemaker_session=sagemaker_session,
)

print(f"Upserting and running the full end-to-end pipeline: '{pipeline_name}'...")
pipeline.upsert(role_arn=role)
execution = pipeline.start()

print(f"Pipeline execution started successfully.")
print("You can monitor its progress in the SageMaker console under 'Pipelines'.")
print(f"Execution ARN: {execution.arn}")
Step 4: Run the Pipeline
With all the components in place, the pipeline is ready to run.
- Check Permissions: Confirm that the SageMaker IAM role has
AmazonSageMakerFullAccesspermissions. This is a one-time setup that allows the pipeline to create endpoints and other required resources. - Restart & Run: In the
Launcher.ipynbnotebook, execute all cells.
The automated workflow has now been launched.


Conclusion
The automated workflow has been successfully launched. Its progress can be monitored in the SageMaker console, where each step will turn green as it runs to completion. After approximately 20-30 minutes, the pipeline will finish, and a live, real-time API will be deployed and ready for predictions. This marks a significant step from manual experimentation to automated, production-ready MLOps, resulting in a repeatable and robust system for training and deploying models.


